The Wandering DP Podcast: Episode #75 - VFX Cinematography Part 2
The VFX process is becoming easier and easier...
I am not sure if it is just me or if that is actually true but in today's podcast we continue our series on VFX cinematography. It might be harder for VFX people but easier for me. Ignorance is bliss.
This week we break down a commercial that has a giant VFX elephant for a co-star and we dive in to how VFX heavy spots are produced and how that process may differ from other productions.
Part #2 - VFX Cinematography
If you haven't listened to part #1 of our series I would encourage you to start there.
In episode #72 we lay down the basic frame work for the production and talk specifically about what a VFX heavy commercial entails from a cinematography point of view.
Listen to Episode #72:
Lighting & Reference Document - Free Download
Don't forget to download this week's exclusive InDesign template for cinematography preproduction.
This is the exact template that I have used and developed over the past 4 years. Many of you have seen examples of the different documents I send out in past show notes pages so I decided to make the template available for everyone.
"This document and understanding it's power has improved my cinematography more so than any other tool I have come across."
I take this template and use it for all my preproduction documents. Project References, stills references, lighting diagrams, and more. Now you can experiment with this workflow by clicking the link below.
Patreon Podcast - The Next Level
The power in the preproduction template starts with establishing a consistent and elevated level of visual curation.
The template by itself is fairly simple.
There is a series of boxes that allow for drag and drop placement as well as some other housekeeping items that make formatting the pdfs significantly faster.
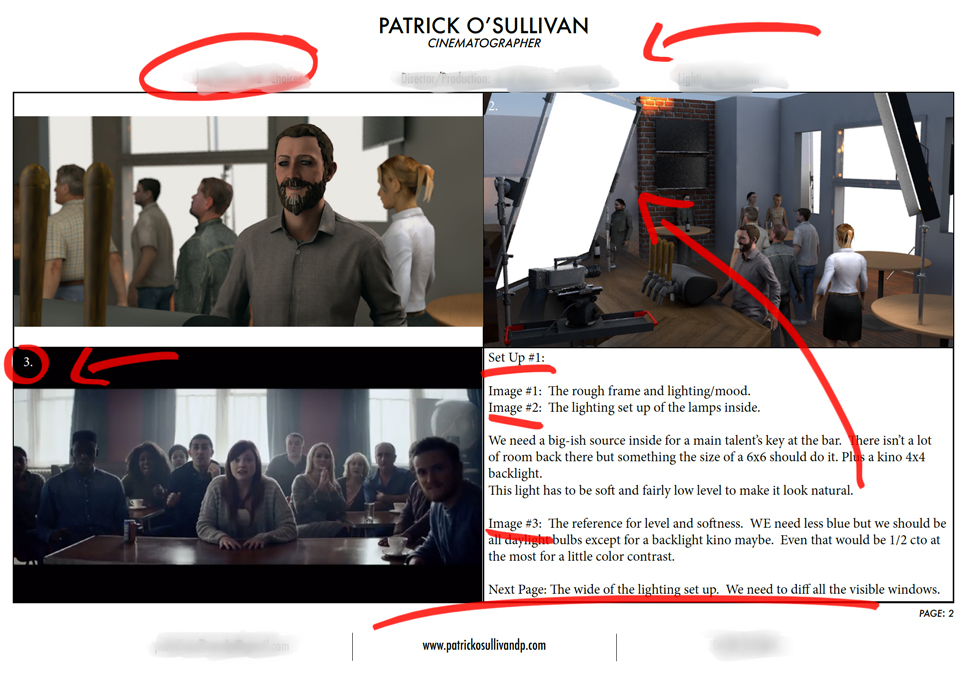
The true power comes from understanding what to put in, when to send it out, who to send it out to and most importantly where best to allocate your preproduction man hours to in order to maximize your effeciency.
This week on the Patreon podcast this is exactly what we will be diving in to. We go over what to include, why I do it that way, and discuss how after years of experience you can skip all of my mistakes along the way.
This podcast is my way of saying thank you to all the support from the Patreon crew and hopefully you can use the template as a guide for your own approach.
Case Study: The TVC

This spot looks easy...
And it is if you have prepared and have the right tools and crew. The trick is in organizing the details beforehand so that the shoot can be as pain free as possible.
No matter how much preproduction you do there will be issues that come up that you hadn't expected. Those issues are what keep the job interesting and fun but they are only fun if you are dealing with 1 or 2 of them.
If you are dealing with 10 of the issues at the same time it can get overwhelming and the quality can get away from you.
Location & Scheduling
The key thing for a spot with heavy VFX is planning and scouting.
In this commercial we were shooting on location both interiors and exteriors. This means we really have to be on our toes and try and recognize any possible issues as early as possible.
Luckily for me the director had nailed the location and from there it came down to scheduling to ensure we were where we needed to be at just the right time.
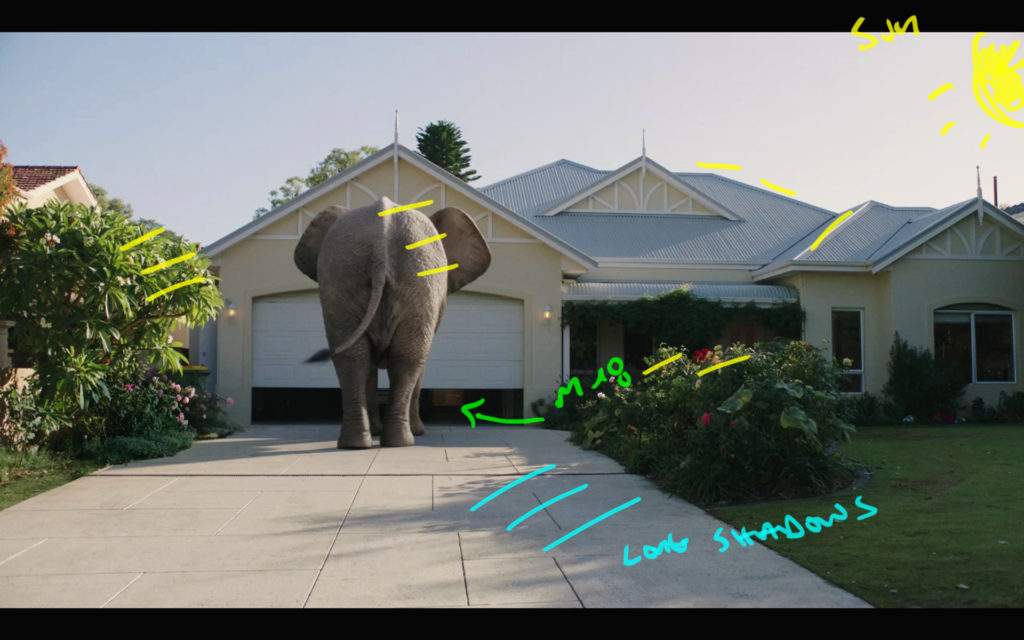
Let's start by taking a look at the boards so you can get an idea of the story.
Story Boards
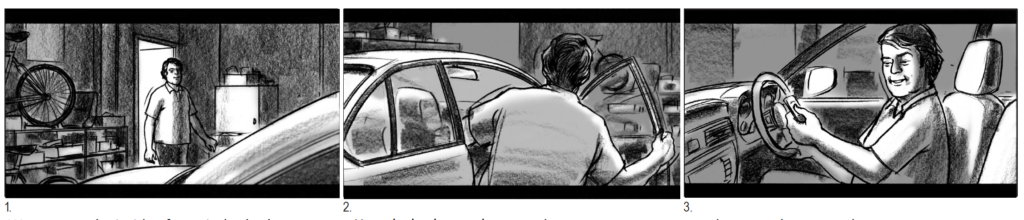

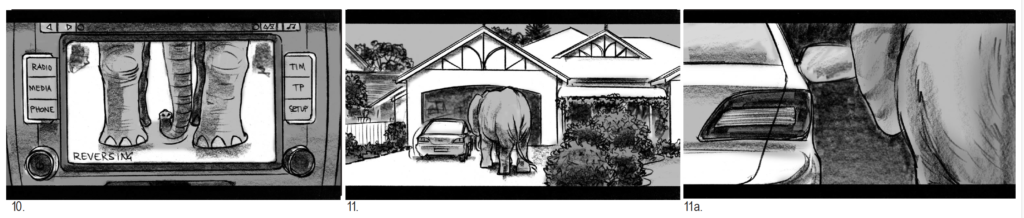
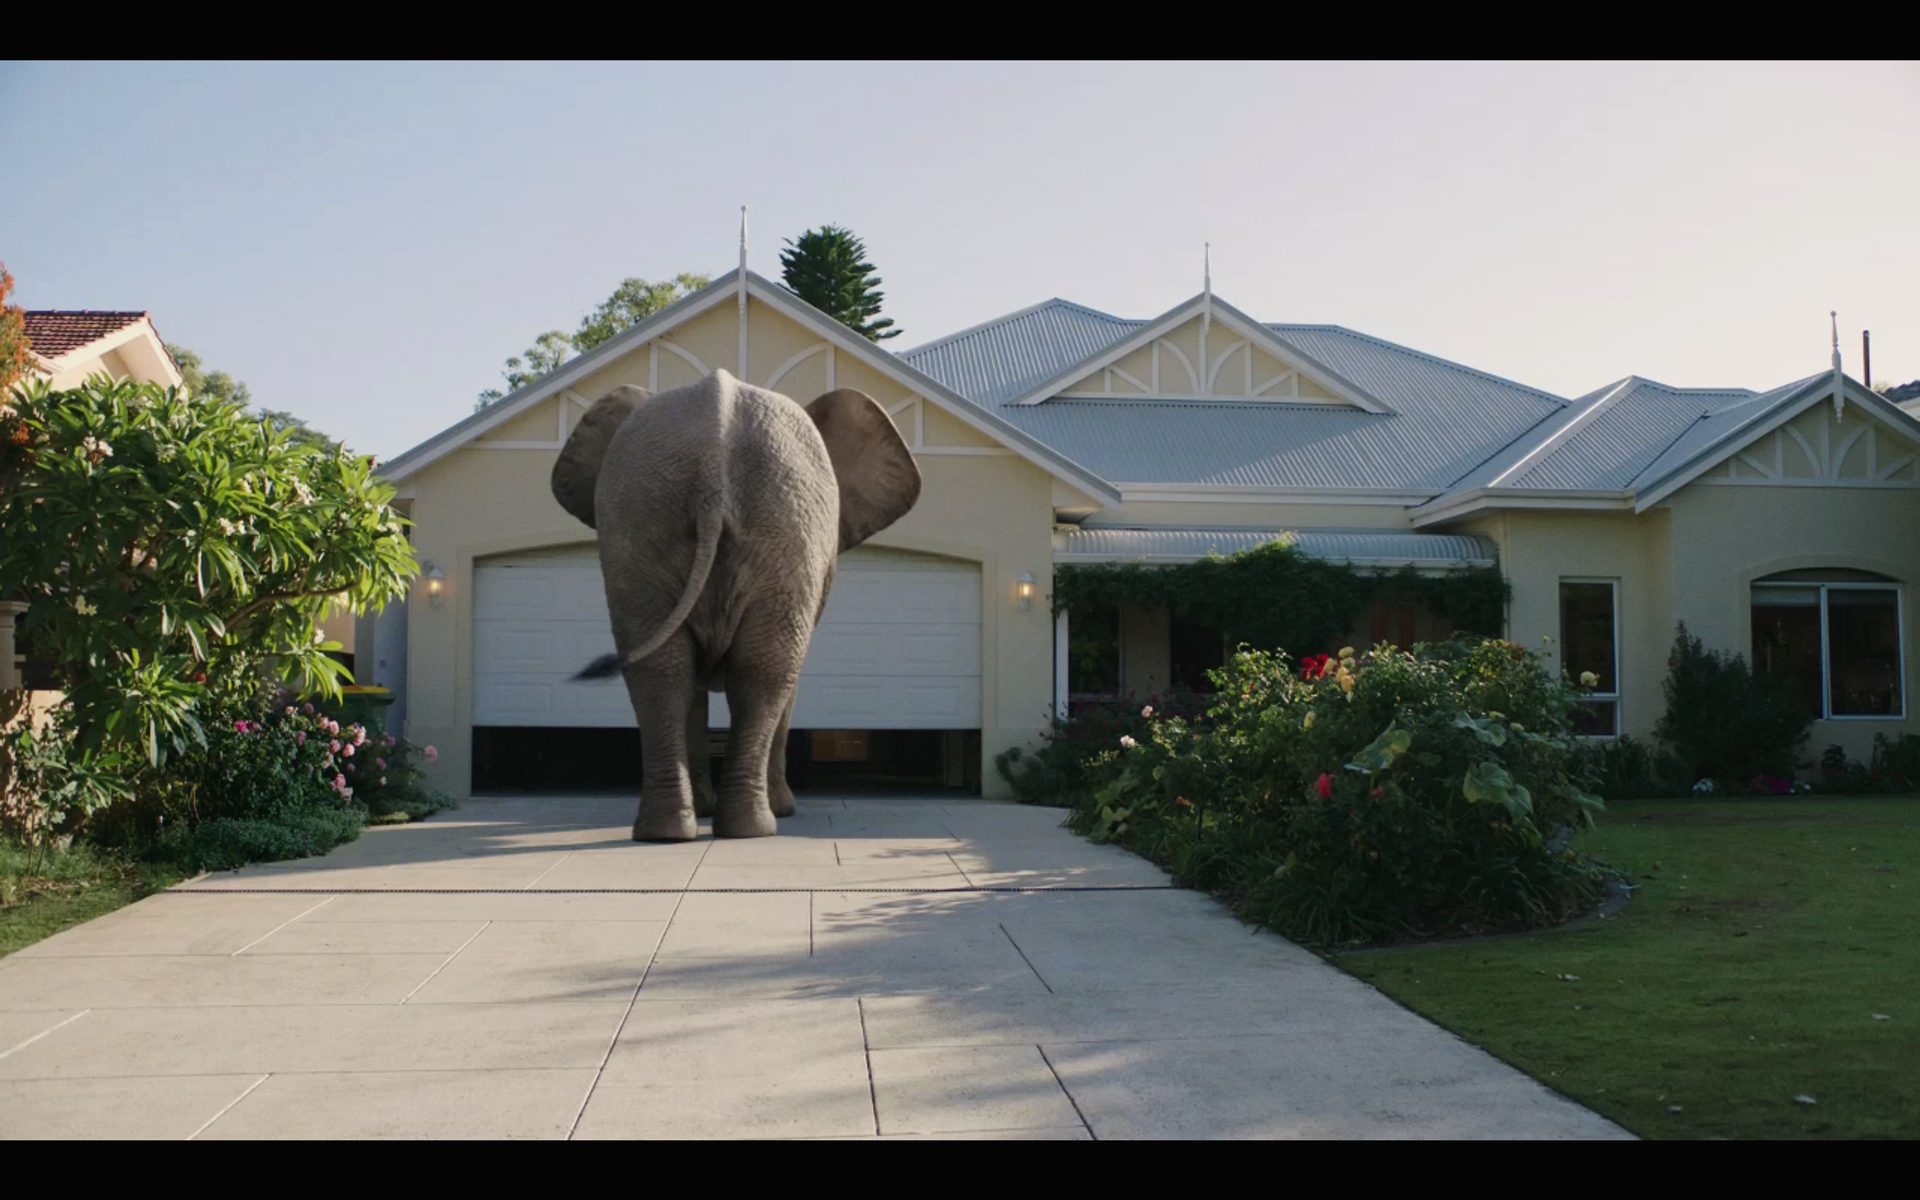
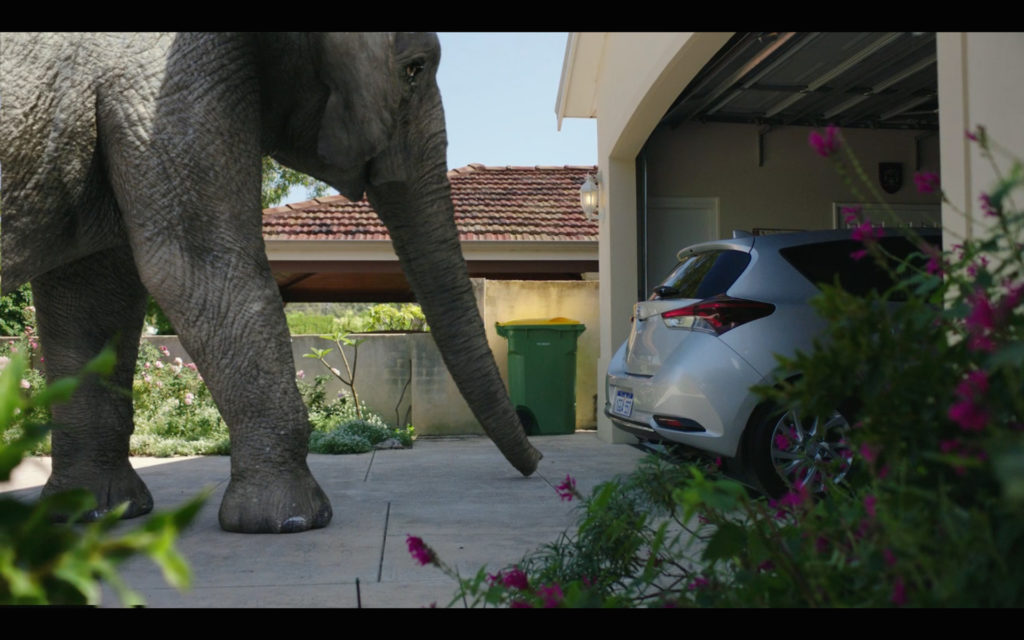
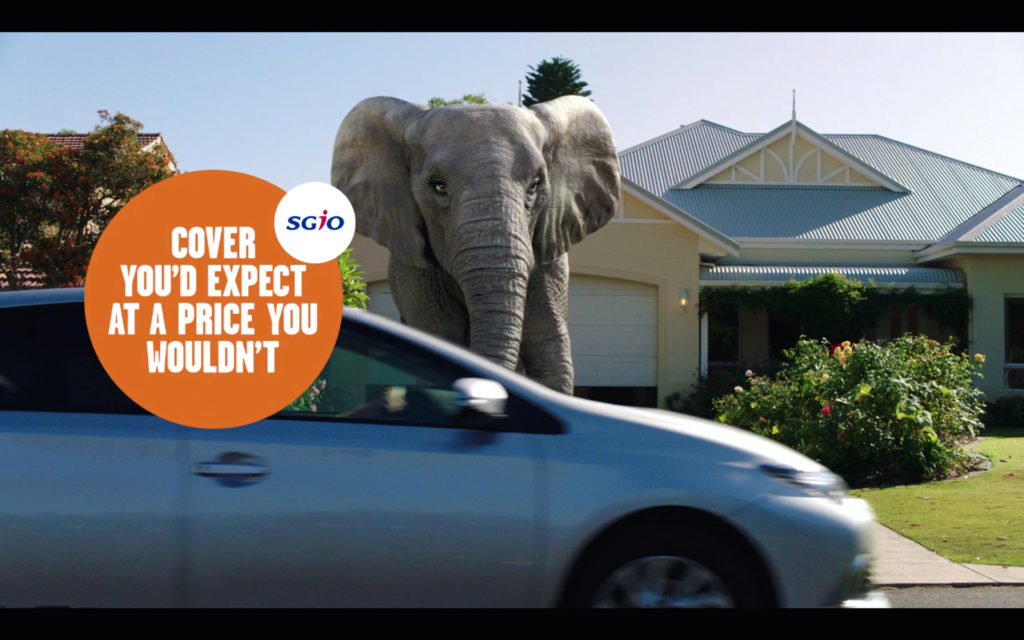
So the idea is a man exits his house early in the morning to go to work.
He drives out his garage oblivious to the giant elephant on his driveway.
Simple. Now let's take a look at the final images and then go deep into seeing exactly how we lit and executed each frame.
Final Images: VFX Cinematography
Shot #1
Shot #2
Shot #3
Shot #4

Shot #5
Shot #6
Shot #7
Shot #8
Shot #9
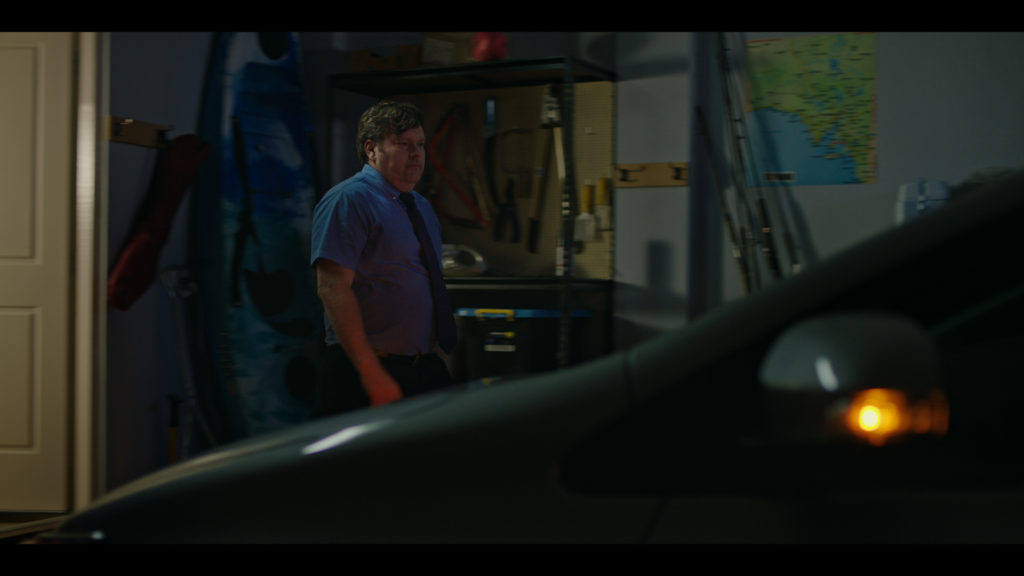
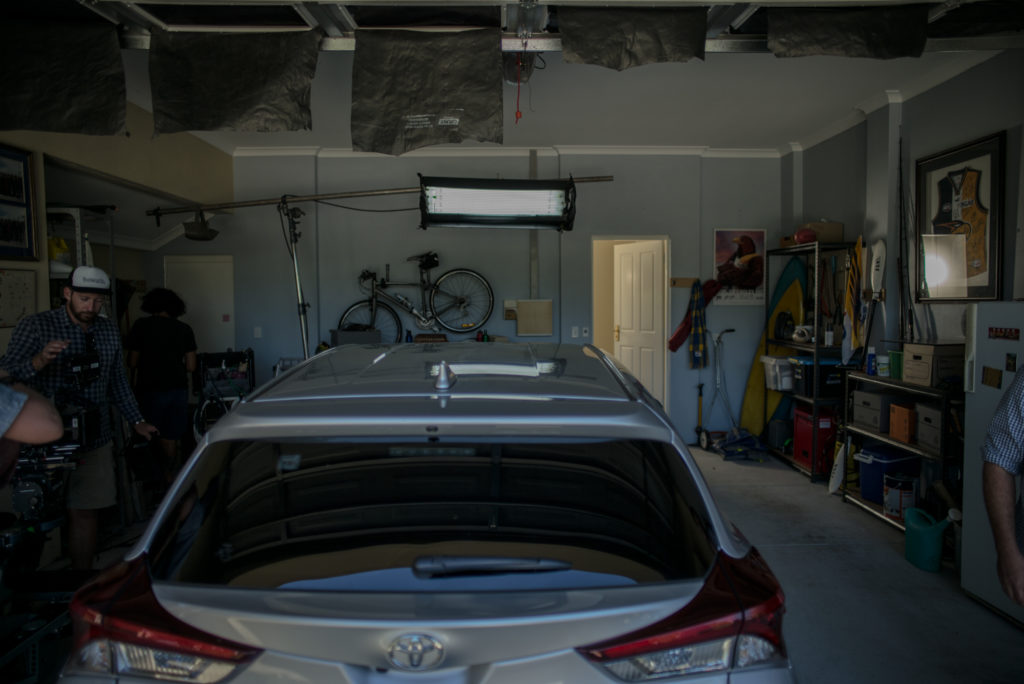
Shot's 1 & 2 - Interiors
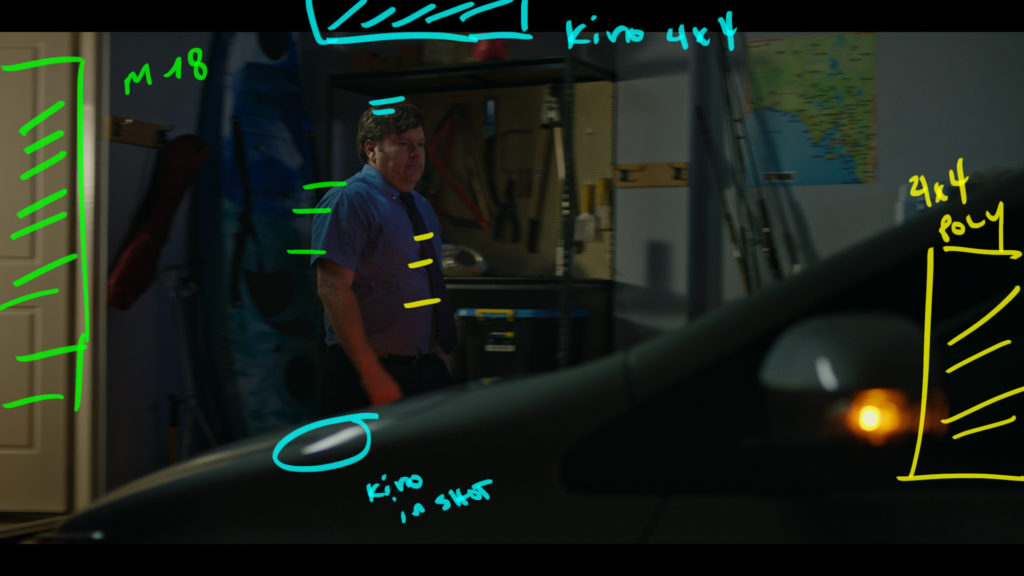
The Shot
Our talent enters frame left from the door and walks to his car.
The Lighting
We wanted to keep the levels fairly low. The idea was for it to be dark but to still be able to immediately place our talent and his surroundings.
The first shot in an idea has to set the scene so here is what we decided to go with:
- Arri M18 - out the front door bouncing into a 4x4 Poly. This was our warm morning interior light.
- A kino 4x4 daylight - on a menace arm hanging over the car to act as the garage light.
- Lots of blacks as we needed to block all the light coming in from the garage windows.
- 4x4 Poly - This finaly poly was just bouncing back a little level from the M18 into oour talent's face as he walks towards the car.
The Results
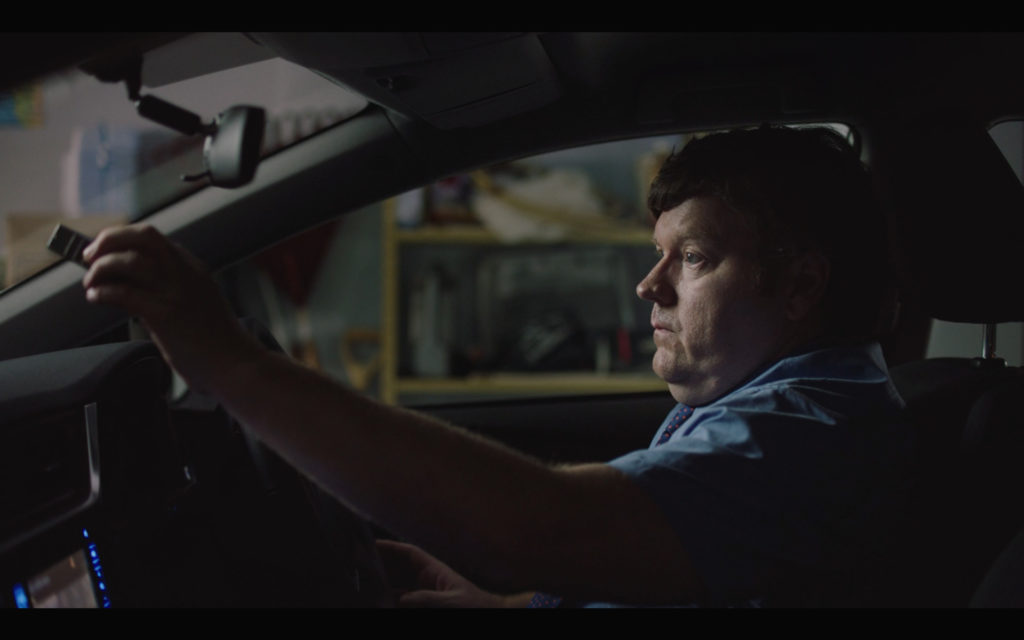
The Follow Up Shot
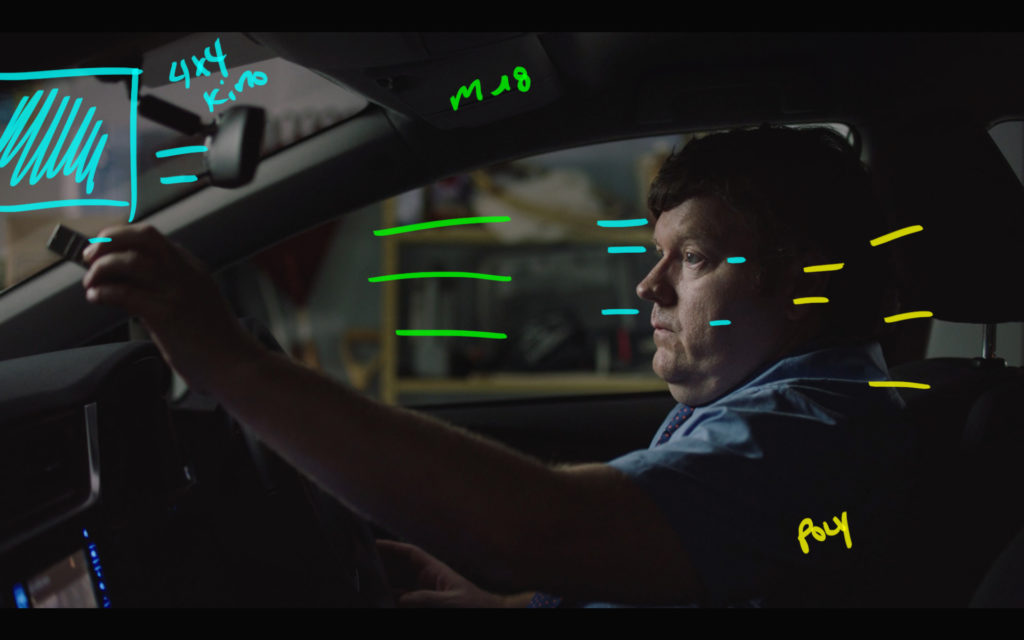
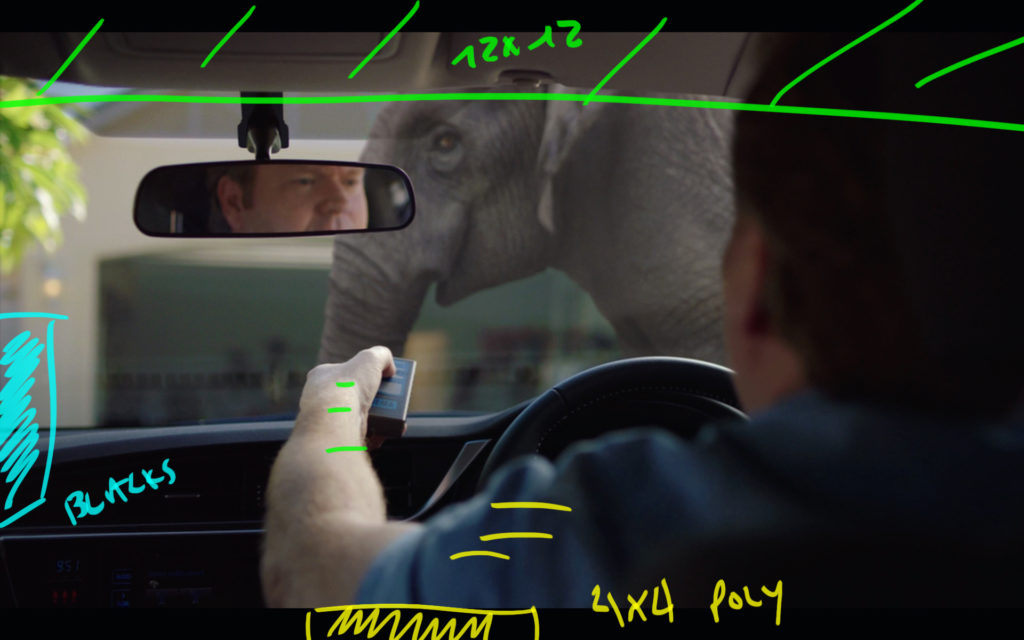
The Shot
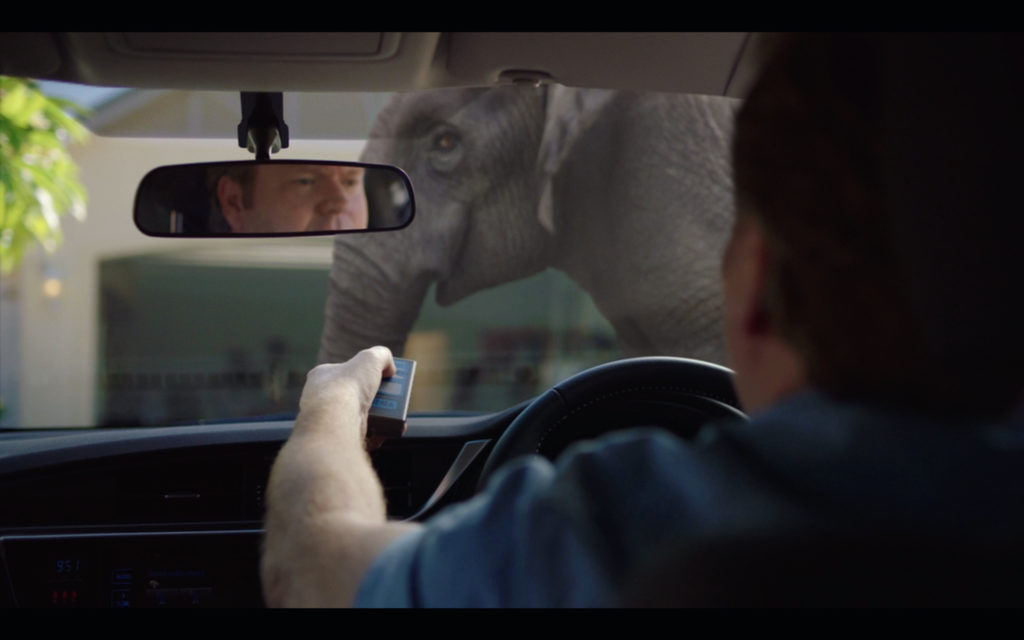
We see the talent in the car as he hits his remote.
The Lighting
Same fixtures as before we just rework the Kino to get the shadow across his face to line up where we wanted it. Then we took the Poly from outside the car and stuffed it in the back seat to give him just a bit of edge.
- Arri M18 - out the front door bouncing into a 4x4 Poly. This was our warm morning interior light.
- A kino 4x4 daylight - on a menace arm hanging over the car to act as the garage light.
- Lots of blacks as we needed to block all the light coming in from the garage windows.
- 4x4 Poly - This finaly poly was just bouncing back a little level from the M18 into oour talent's face as he walks towards the car.
The Results
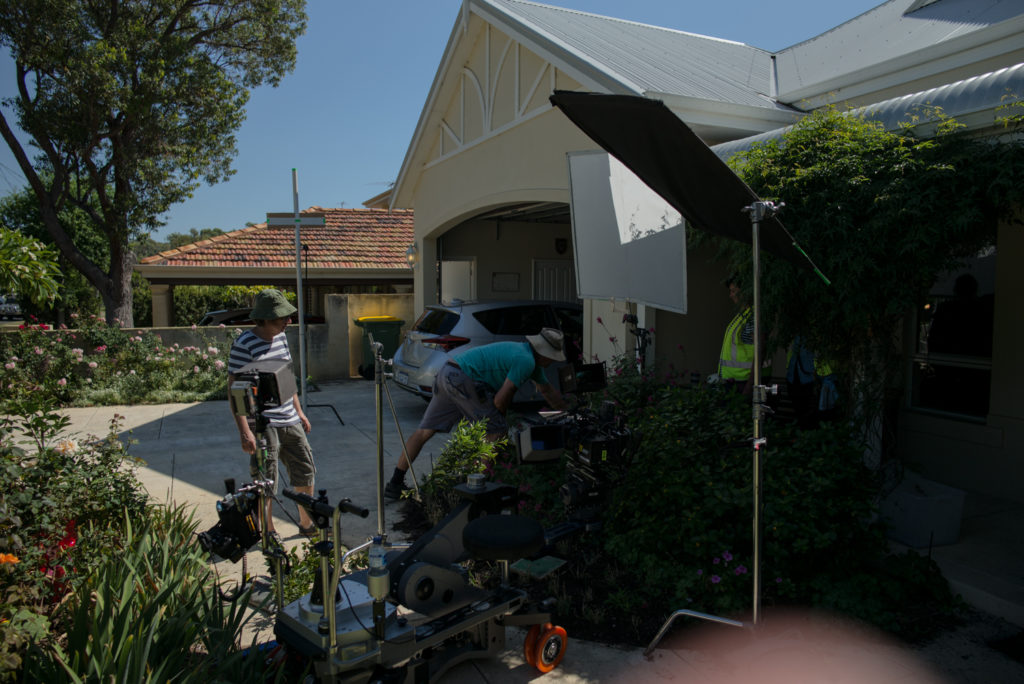
Behind the Scenes
The Exterior Wides
The Shots
All 3 of these shots had zero lighting. The key to getting them to look like the do is scheduling and scouting.
We had seen the location on the tech scout day and we sat down and hashed out the plan with the director, 1st AD, myself and the Gaffer.
My main points were:
- Shoot early to get the house backlight. Not to early though because we wanted some shape to the shadows.
- Shoot everything before the sun crept into the frame causing the sky to blow out.
- Try to sell Qtake and an operator on to the job so we could see the VFX elephant as we were lining up shots.
The Results
Behind the Scenes

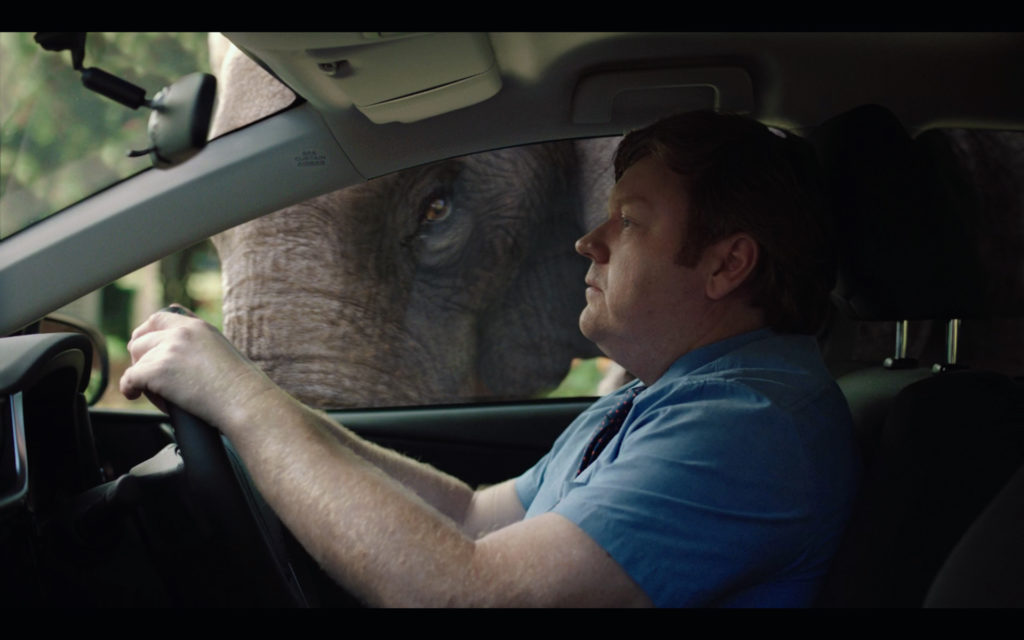
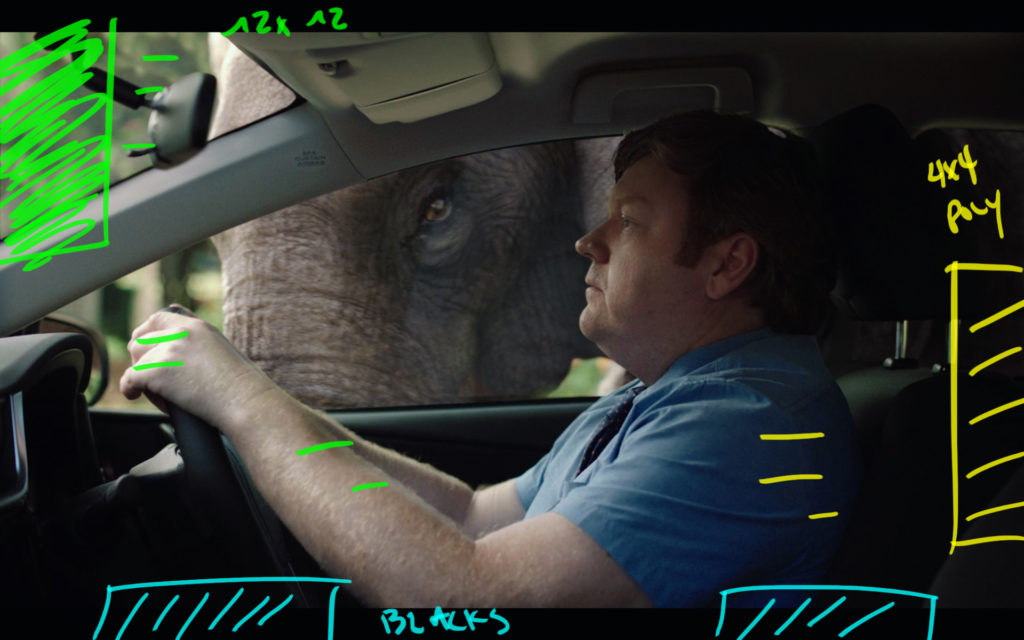
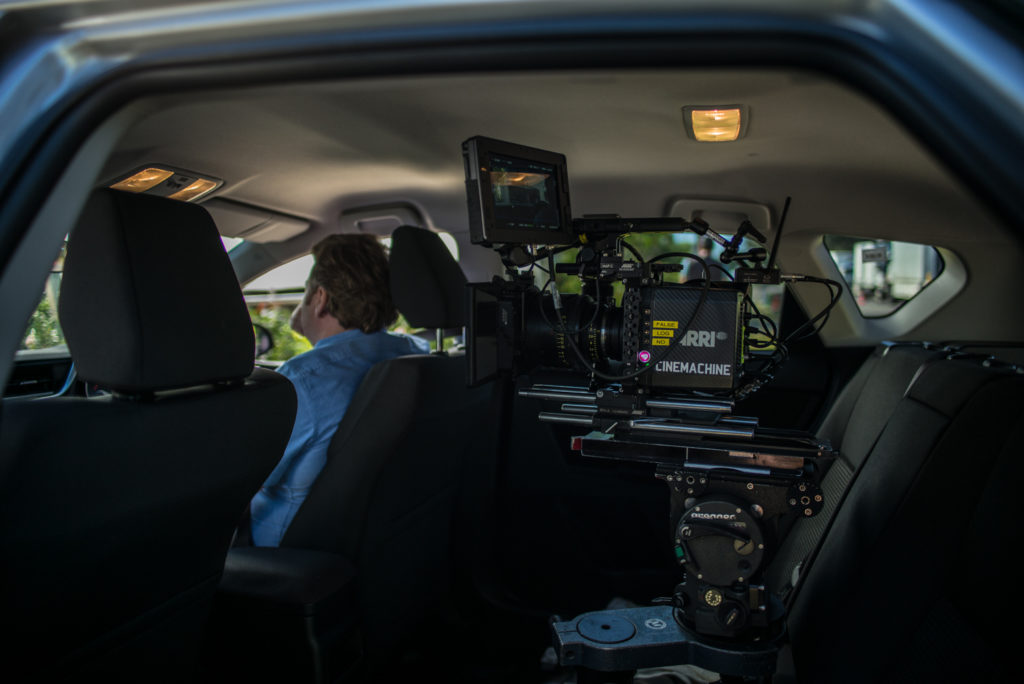
Car Interiors - VFX Cinematography
The Shots
We needed to go inside the car to get a closer shot of the talent and the elephant in the same shot.
The sun had moved higher in the sky so to control contrast we had to make a few basic adjustments.
The Lighting
The sun was the only level for the car interior scenes. The problem was the intensity and the angle.
To correct the intensity we placed a 12x12 frame just out of shot to soften the levels and to decrease the overall contrast inside the car.
Lucky for me the front windows on the sides were tinted so we could afford to take the level of the sun down without having to gel the in shot windows.
- 12x12 1/4 Grid Frame - Softens the sun and lowers the contrast inside.
- Blacks - Controls the contrast on the camera side of the car by reducing the light. That meant we could get some shape on the talent's face and still shoot sort of in to the shadow.
- 4x4 Poly - Shoved in the back to compensate for all the level we lost putting up the blacks.
The Results
Behind the Scenes

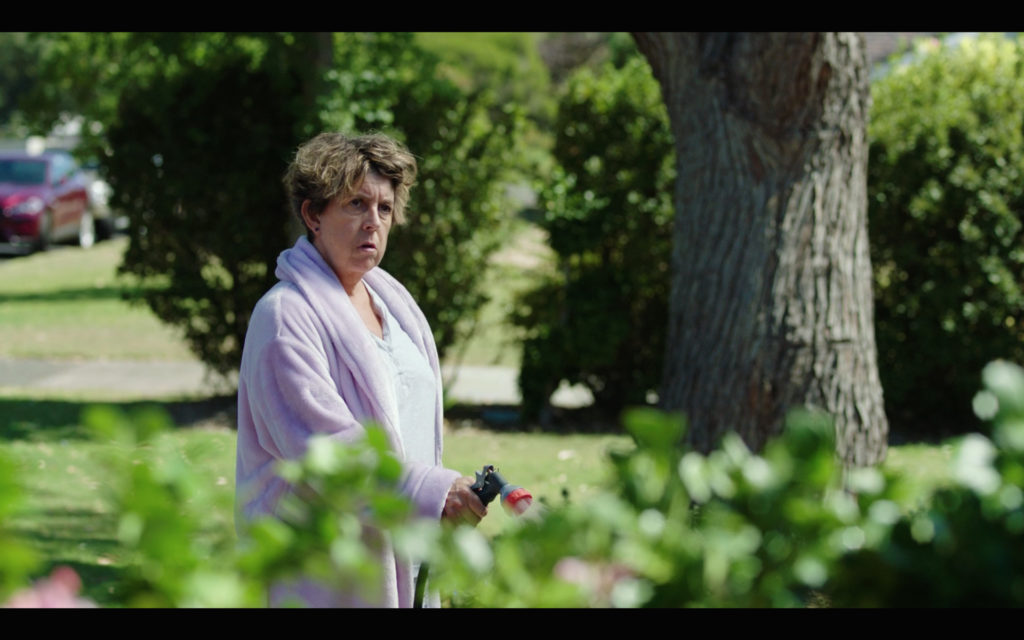
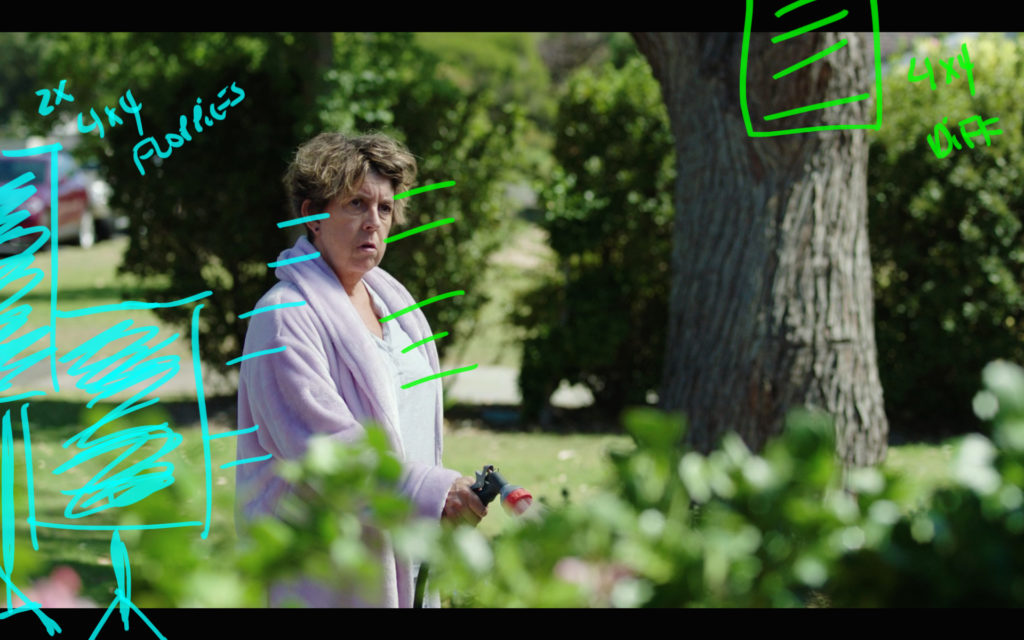
The Neighbor
The Shot
We needed a shot of the neighbor outside as she stares at the elephant. This was set in the yard next door and the schedule for the other shots forced this too later in the day than I would have preferred.
The Lighting
The main issue was taking the harshness away from the sun but at the same time not making her look like she was standing in shade.
- 4x4 Frame of Light Diffusion - Take away the harshness of the shadows on her face and body.
- 2 4x4 Floppies - Used to create a wall of darkness to shape some contrast back on to her face that the diffusion made to flat.
The Result
Quick Before You Go
Be sure to check out this episodes freebie InDesign Lighting and Preproduction template.
This template and the ideas behind it's use and set up have revolutionized my approach. You can get it now by clicking on the button below.
If you are a Patreon supporter make sure to check out your exclusive podcast where I breakdown what you need to know in order to maximize this documents effectiveness.