
Listen to the Podcast
This week on the podcast we are looking at one of the most challenging scenarios for cinematographers to be asked to shoot in and that is Night Exterior Lighting.
Night exterior lighting can be challenging if you aren't familiar with all the tricks and in this breakdown we share some of the easiest steps to take to ensure you get closer to the results you are after.
Patreon Podcast - Bad Night Cinematography
It is easy to look at polished night exterior work and recognize it's strengths but in this week's Patreon podcast I go over the main pitfalls of night exterior work and how to recognize if your work is treading in the danger zone.
Once you know the definite "don'ts" it is much easier to work your own way around a problem.
Patreon support helps keep this show going and I couldn't continue to put out new content each week without it. In turn for becoming a supporter of the show I put up extended podcasts for Patreon listeners.
You can gain access to all the extended podcasts that aren't available anywhere else online simply by becoming a supporter.
Check out the Wandering DP Patreon page and if you do decide to become a member please know that I truly appreciate the support.
The Commercial - Fallen Power Lines
The concept of the commercial we are looking at today is quite simple.
A man driving a car runs into a power pole and the live line falls on his car. He notices the line as a woman approaches to amke sure he is OK. He tells her to stay back and call for help.
She calls the power company and they come and save the day. Easy.
The only real requirement from the script was the time of day (night) and the power pole. We needed a street with power poles and enough room on the sides of the street to make the story seem plausible.
When shooting night exteriors location is everything. Finding a location that works not only for the story but also for all the gear that goes along with making night exterior lighting look the goods.
The Location - The Good & the Bad
The great part about the location we found was the fact that it was on a corner. The power pole was close to the edge of the sidewalk and that meant we could open up the angles a little bit. We didn't have to limit ourselves to shooting down only two angles.
The other good part from a cinematography point of view was the neighborhood was a mix of industrial and residential. This meant there were some larger buildings down the right hand side which could hide and cranes or sources we might need to add some level to the scene.
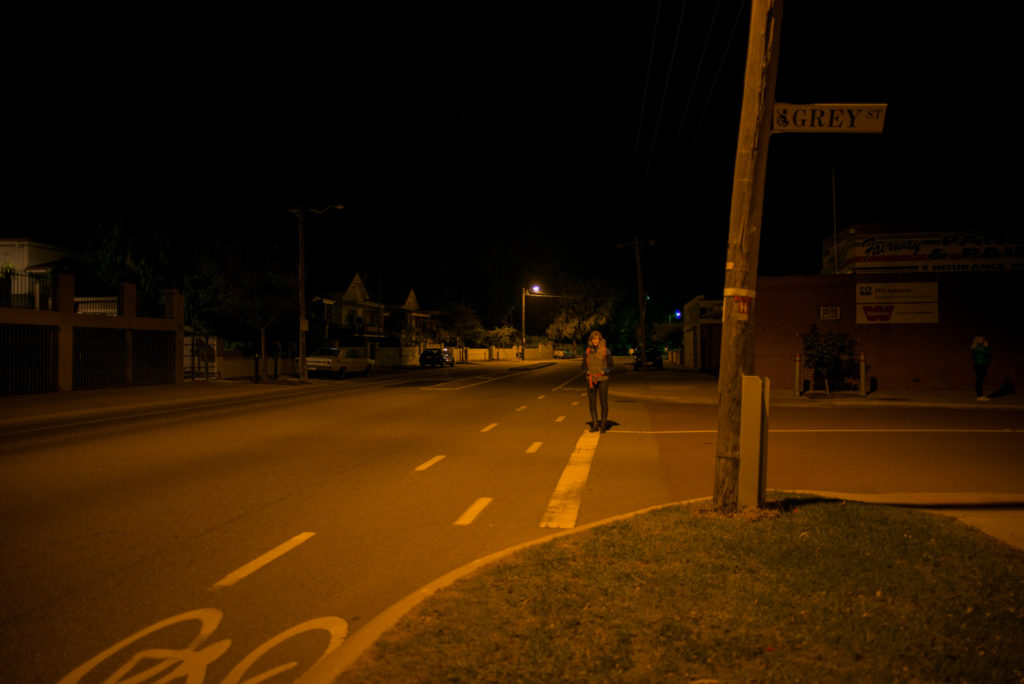
The bad part was there weren't that many actual streetlights on the road. Ideally there would have been 3 or 4 more so we would have had to do less on the night but unfortunately that just wasn't the case and this was the best we had.
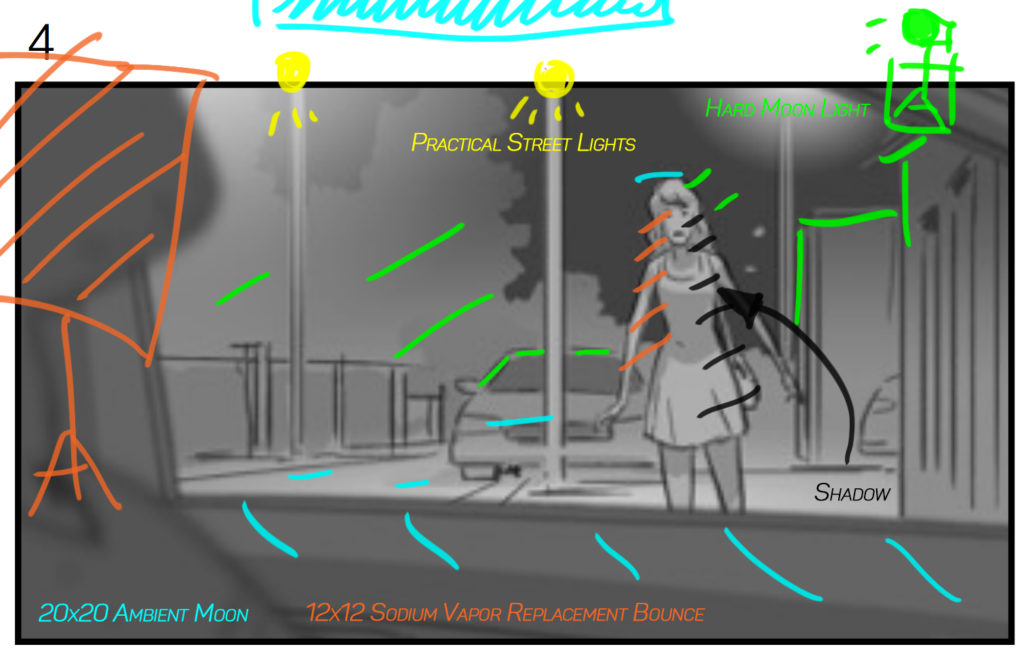
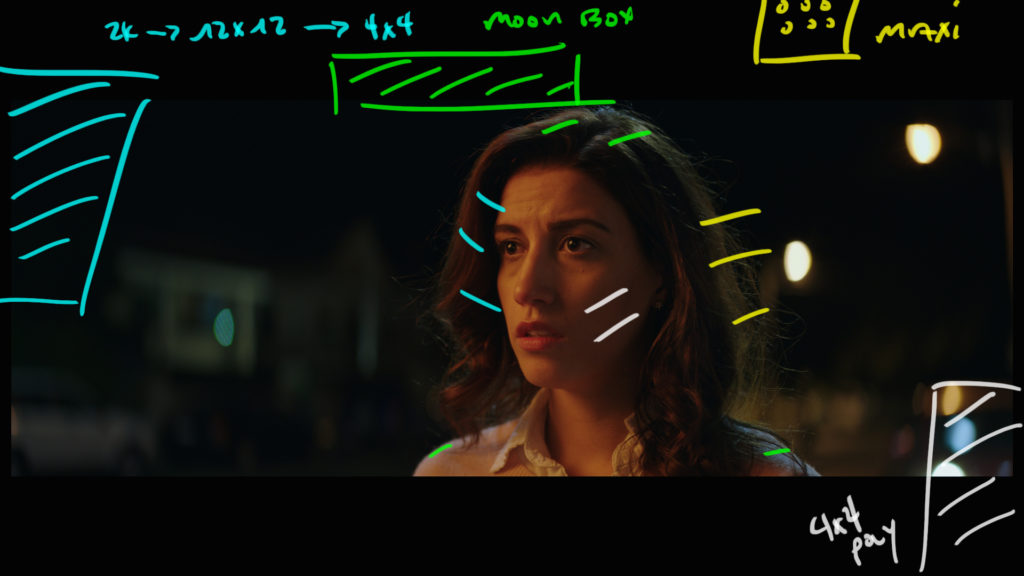
The Main Rig - Moon Box
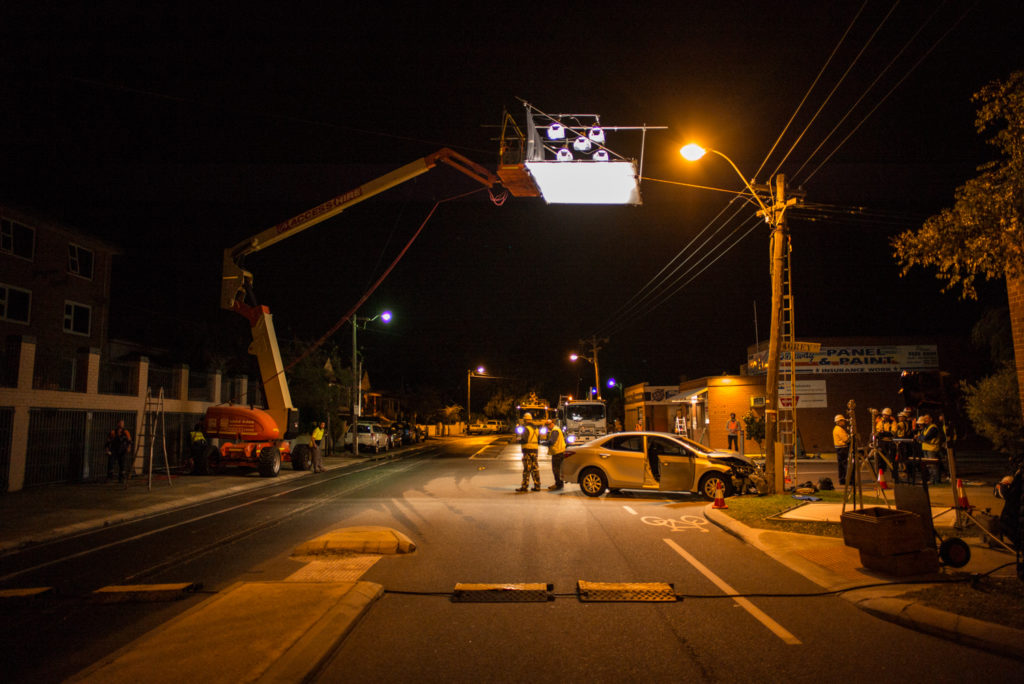
When planning for night exteriors the biggest question to answer is what kind of ambient are we going to play.
There are usually two choices: A hard moon or a softer moon.
The hard moon is easier to pull off because you just need a giant source and the biggest cherry picker you can get your hands on. You stuff it in the BG as far back as possible, point it at the action, and you are good to go.
The softer moon requires a little bit more work to finesse it into the blocking and make sure you aren't shooting directly into the crane as it has to be much closer to the action.
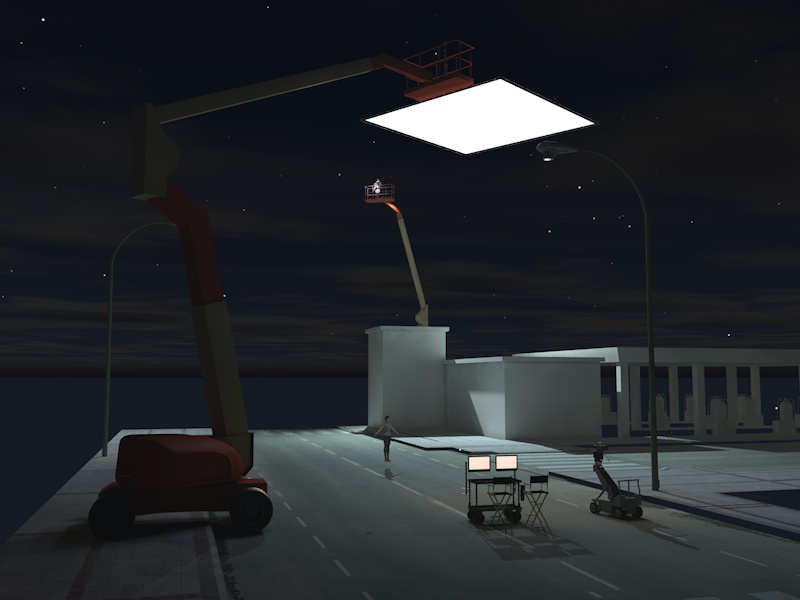
For this spot I wanted to combine the soft moon look I really liked with a bit of a harder edge.
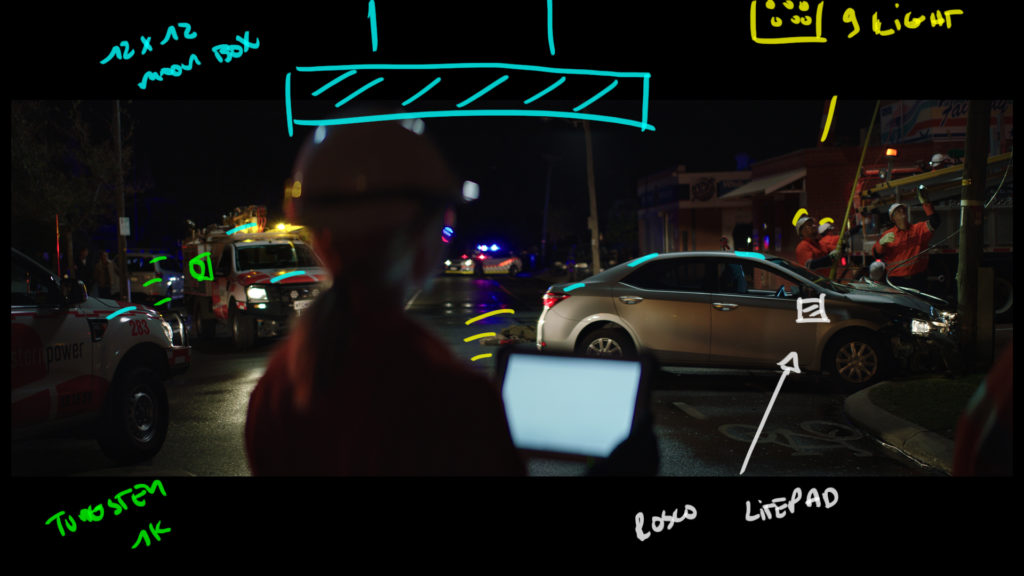
To do this I wanted to build a 20x20 on a JLG 1250 AJP but for budgetary reasons we had to go with the smaller 740AJ. The smaller bucket meant it couldn't safely support the weight that a 20x20 plus all the lamps and leverage of the angle we needed to boom the arm out horizontally so we had to switch to a 12x12.
For the lamps inside the "Moon Box" we ended up using 6 x 2k Blondies. Ideally we would have used Arri Skypanels but we didn't have access to enough of them so we stuck with Tungsten. All the blondies we covered with 1/2 CTB.
Then in the background we went with the same model of crane but loaded it with a Maxi-Brute pushing through a 4x4 of 250 (I think) diffusion. The Maxi would be the hard moon.
The great part about using the Maxi-brute was that if you wanted less level you can just flip off a few of the bulbs rather than wiring. Makes things just a bit quicker.
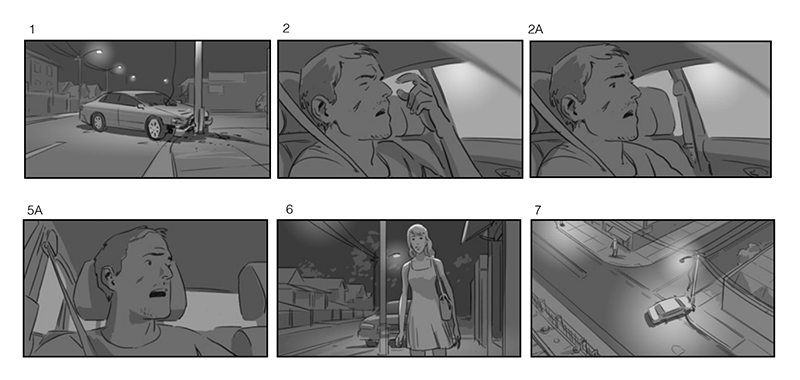
The Breakdown - Night Exterior Cinematography
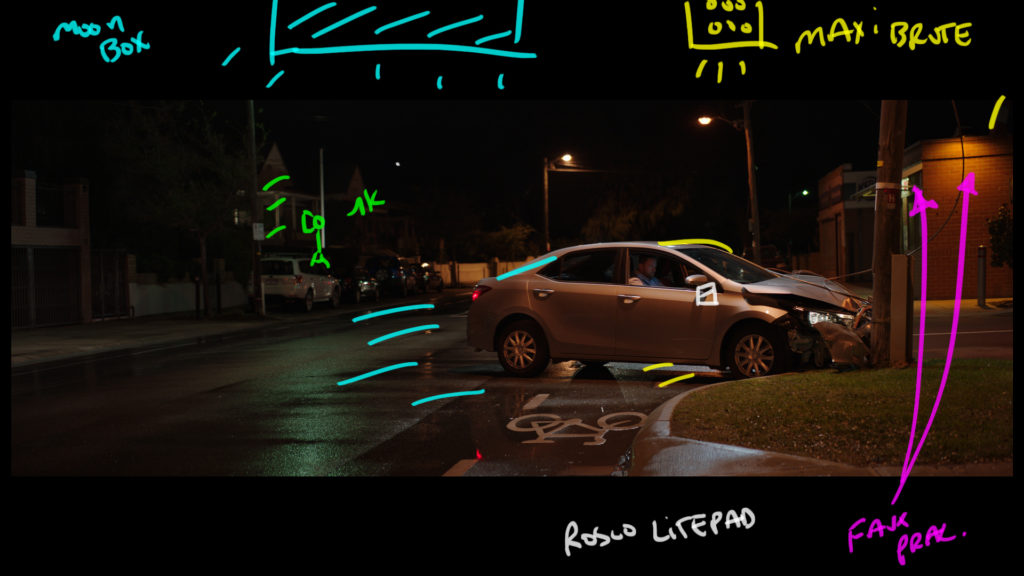
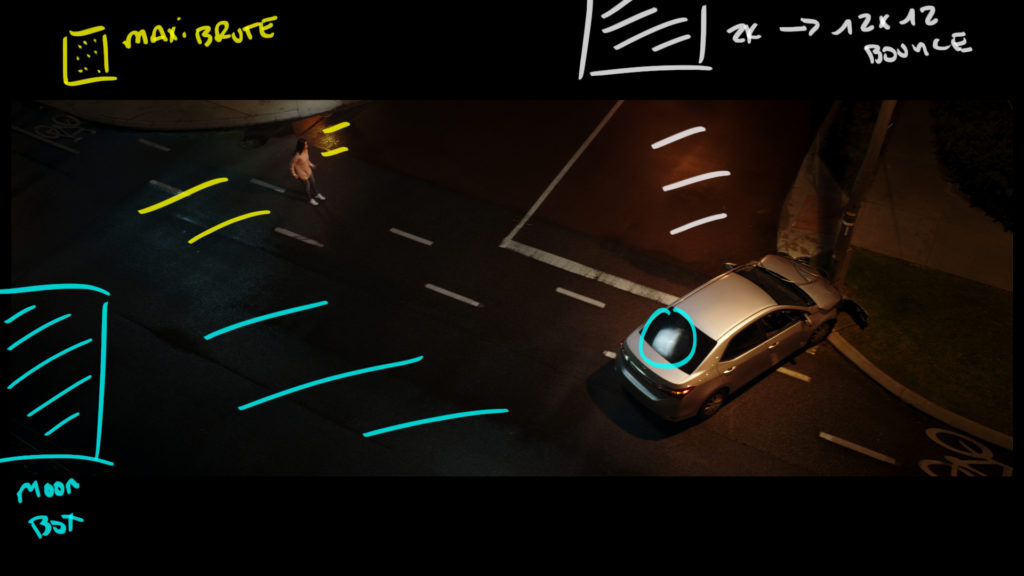
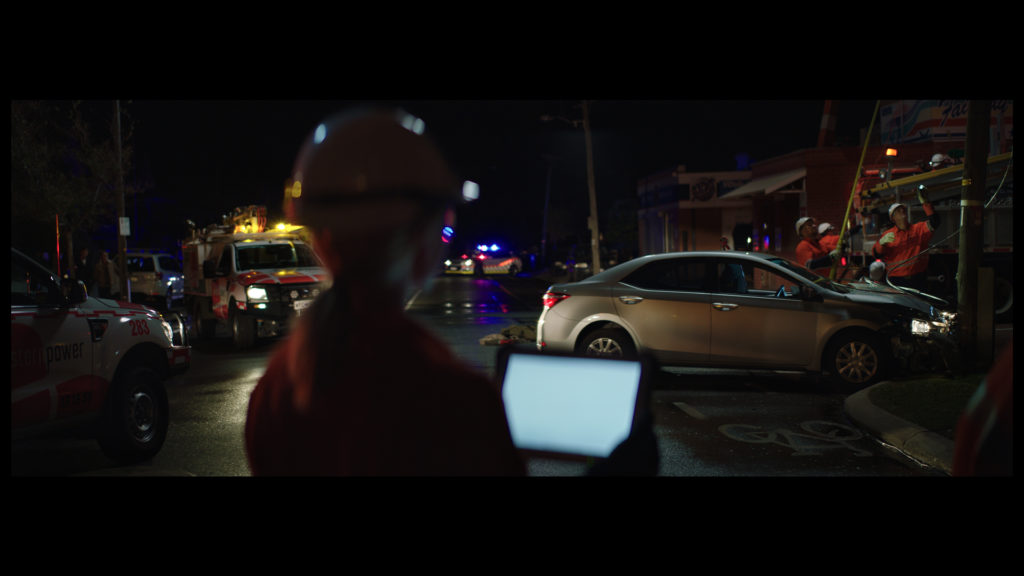
Shot #1 - The Establishing Wide

The Shot
This was the opening shot of the commercial. We needed to see the car, the street, and the street lamps all in the one shot.
The Lighting
For lighting we needed to set the tone for the spot. The "Moon Box" was positioned high and slightly behind the car. The hard edge from the Maxi is as high as it could get and shining just behind the car.
In the background we have the practical street lamps and a few faux practicals that we brought in to accent some of the buildings on the right.
In the deep BG on the left we had an Arri 1K to push a little bit of level on the houses so it wasn't completely dead back there.
Finally inside the car is a small Rosco Litepad. It is in the dash pushing some level on the talent's face as if it was the lights from the instrument gauges.
The Plan

The Result
Behind the Scenes - Night Exterior Cinematography
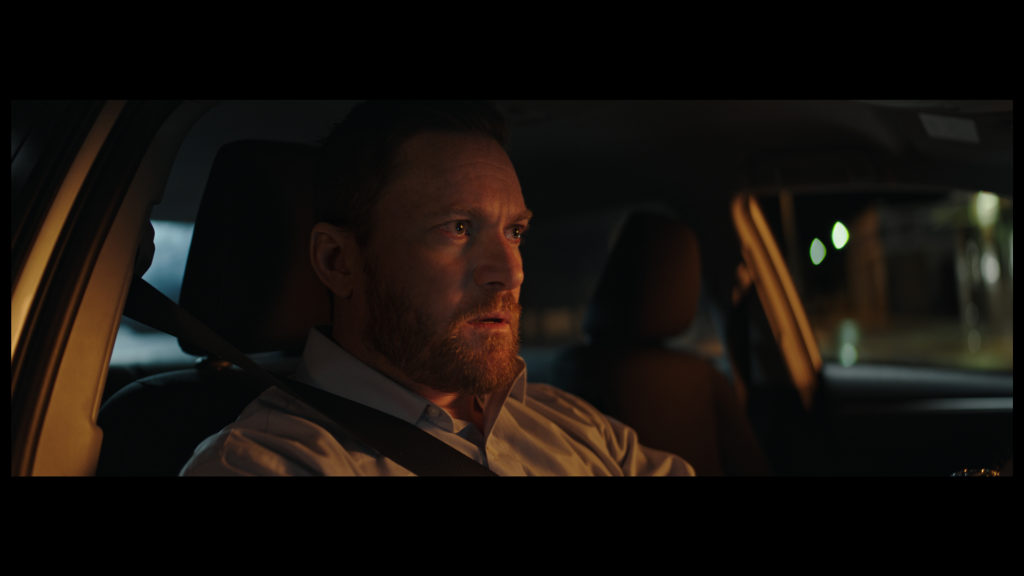
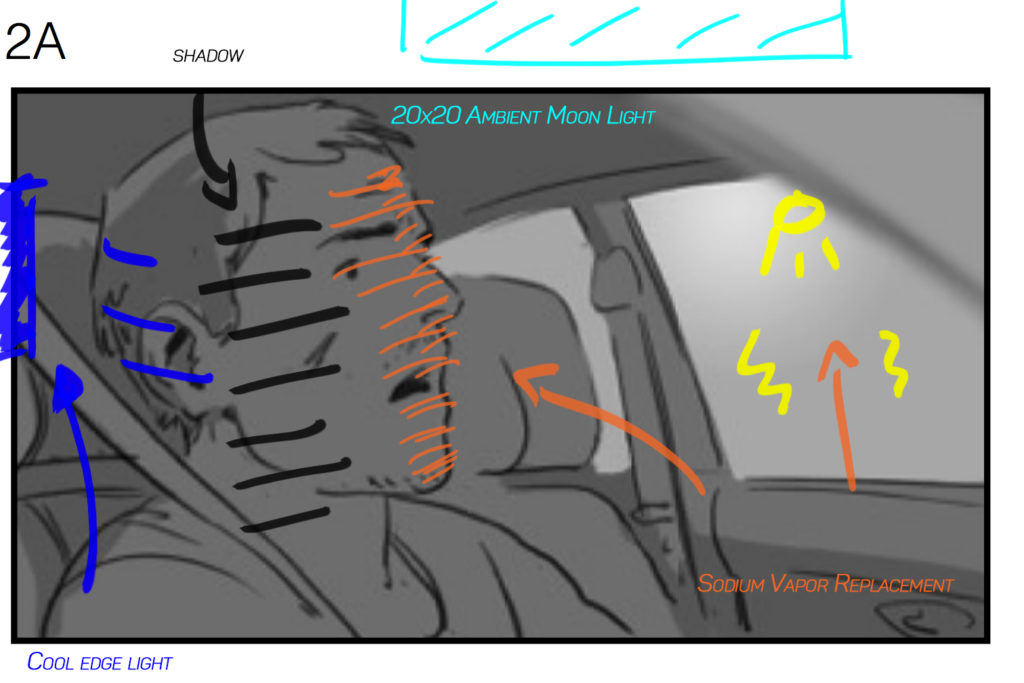
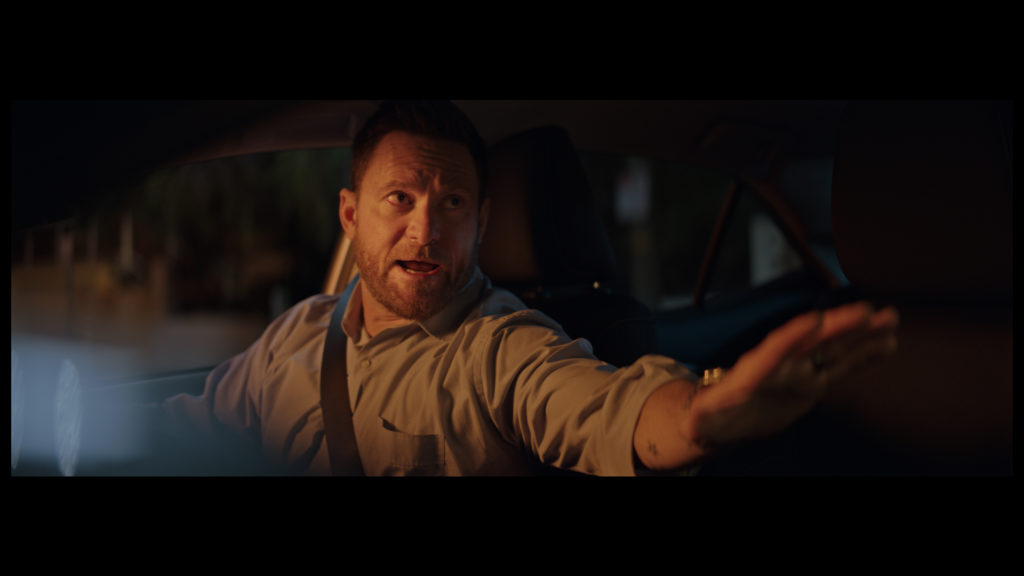
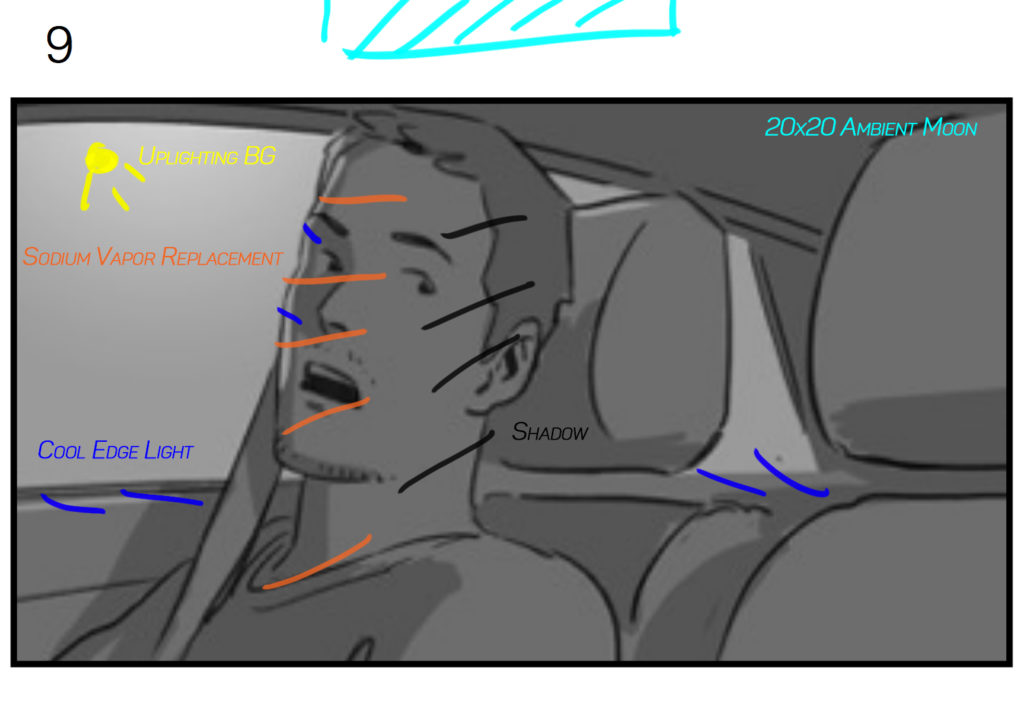
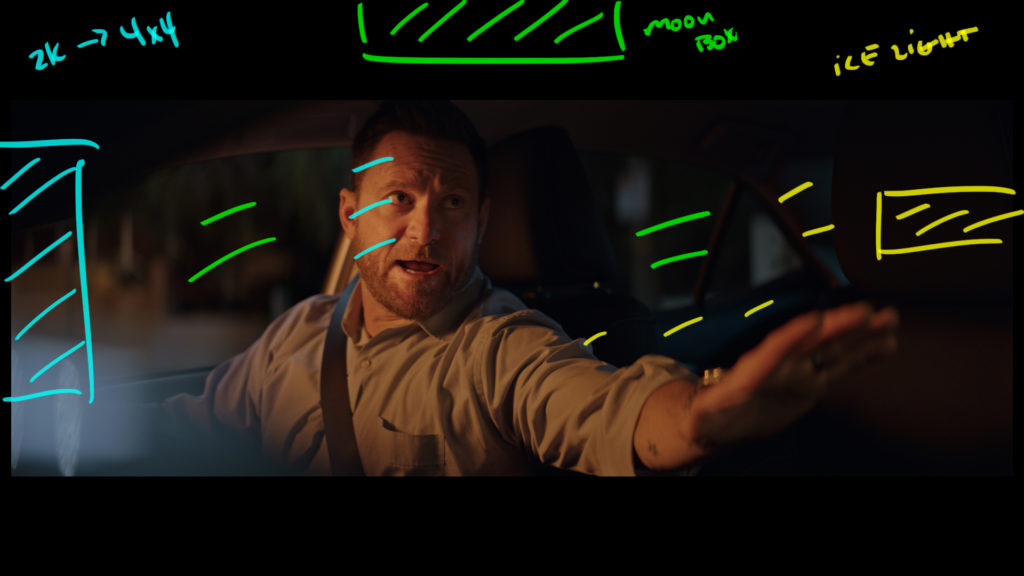
Shot #2 - In the Car
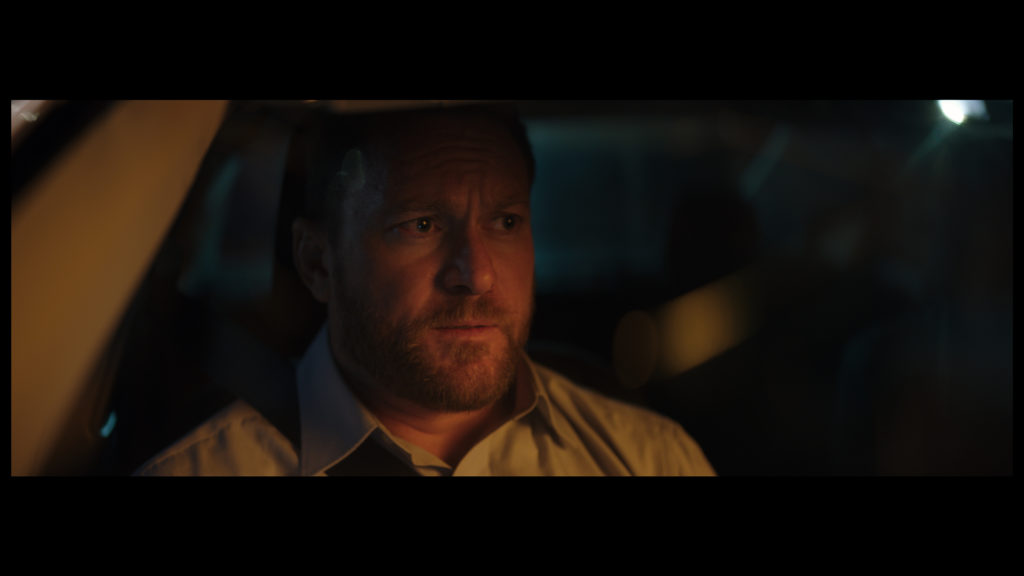
The Shot
This was our first look in the car. When shooting night car interiors you have to fight to keep the talent from being to front lit.
To do that here we just slightly shifted the camera angle and then moved around our faux street lamp light to give us just a hint of shadow.
The Lighting
The main Sodium Vapour source feel is coming from a little 6 light Tungsten unit that was putting out the equivalent of a 2k.
To get a bit more blue from the Moon Box in the background window we added a small icelight (it is daylight balanced) and scraped it horizontally along the top of the rear window.
Finally to get the reflective fill light on the shadow side of the talent we placed another icelight at just the right angle to nail the reflection.
The Plan
The Result

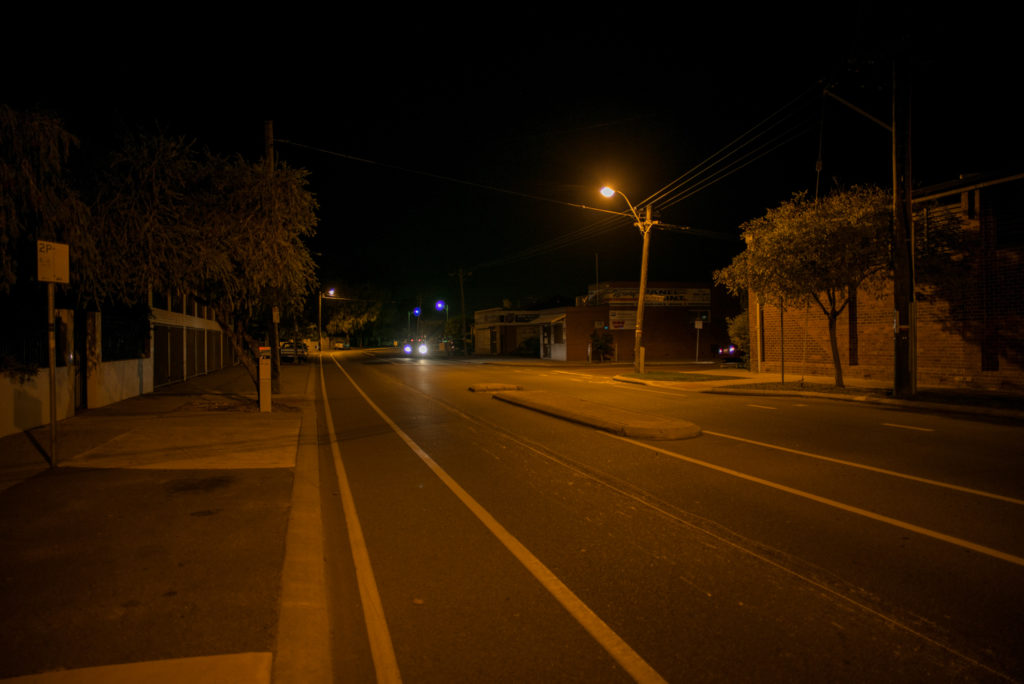
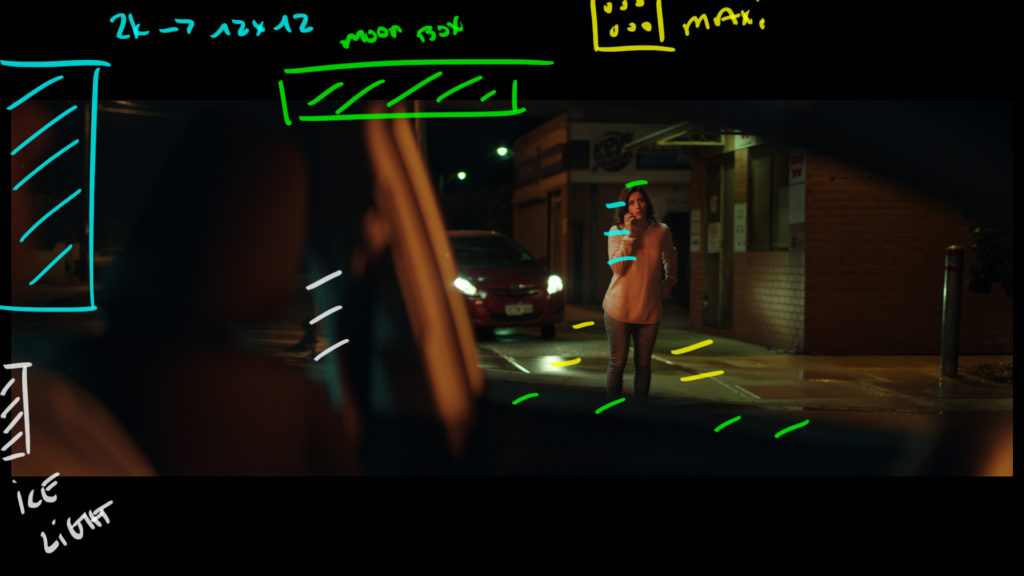
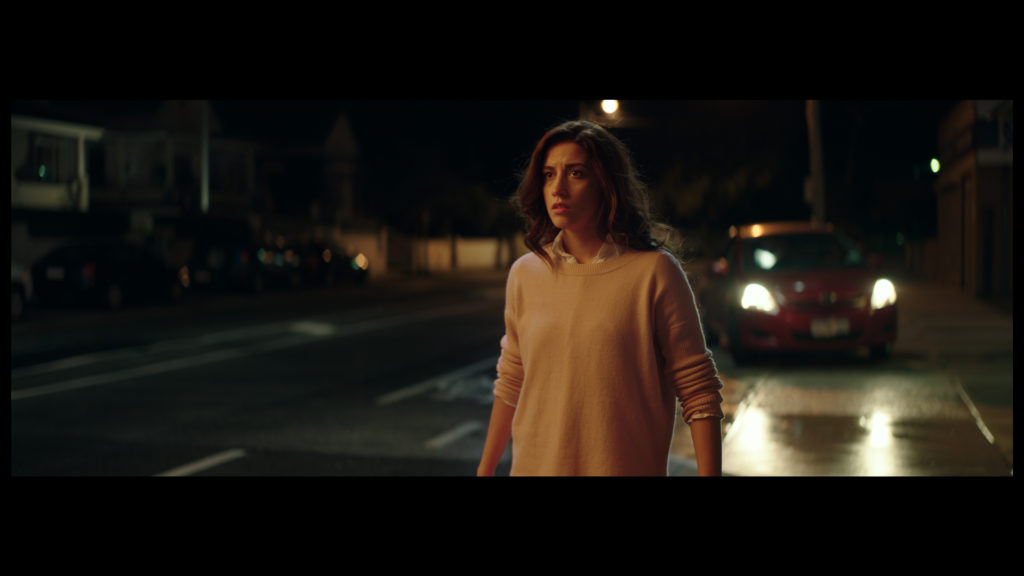
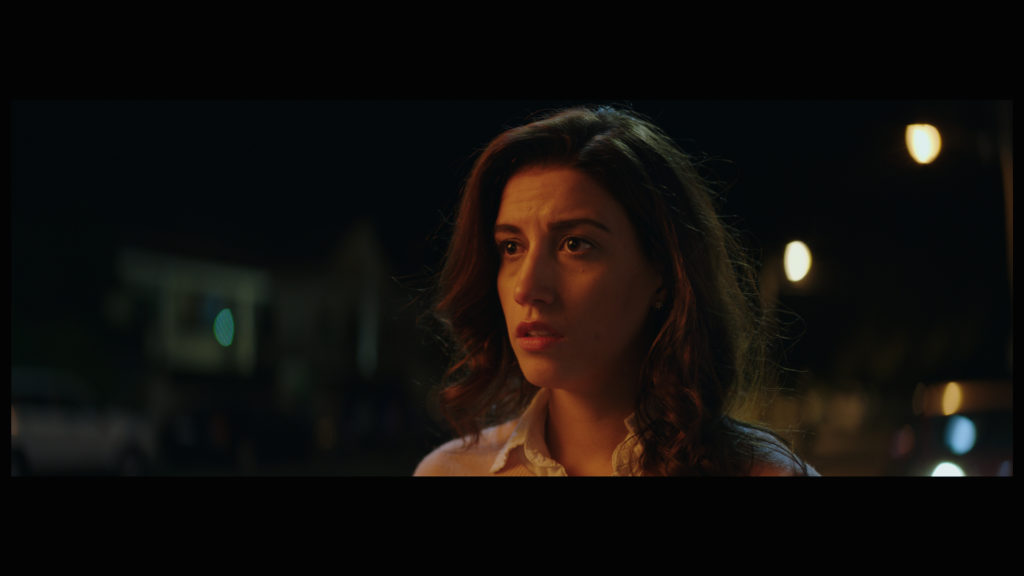
Shot #3 - On the Sidewalk
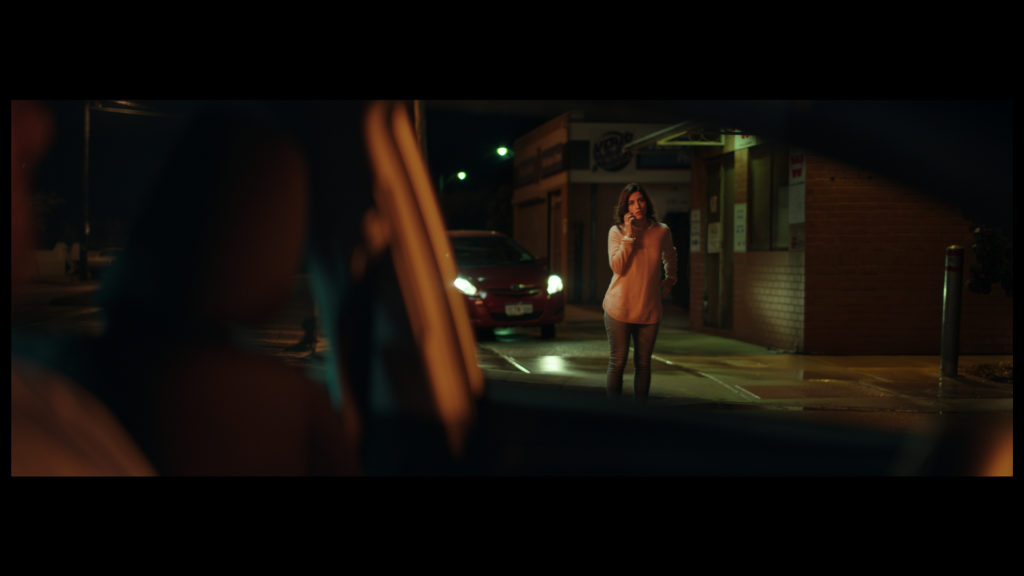
The Shot
We cut wider to reveal our female bystander.
The Lighting
For the lighting we faked a new streetlight coming from camera left.
We needed to come from camera left as we had a few shots back and forth between these two characters and to make sure we were shooting into shadow based on the side of the 180 degree line we had established we needed to come from upstage with the light.
The faux street light is a 2k Blondie bounced into a 12x12 of Ultra bounce,
The lights in the foreground are the same from the previous shot and the BG lights are faux practicals we dressed to shot.
The other lighting is coming from the BG car that we also dressed in to camera and we put some ND on the headlights as they were too powerful.
The Plan
The Result
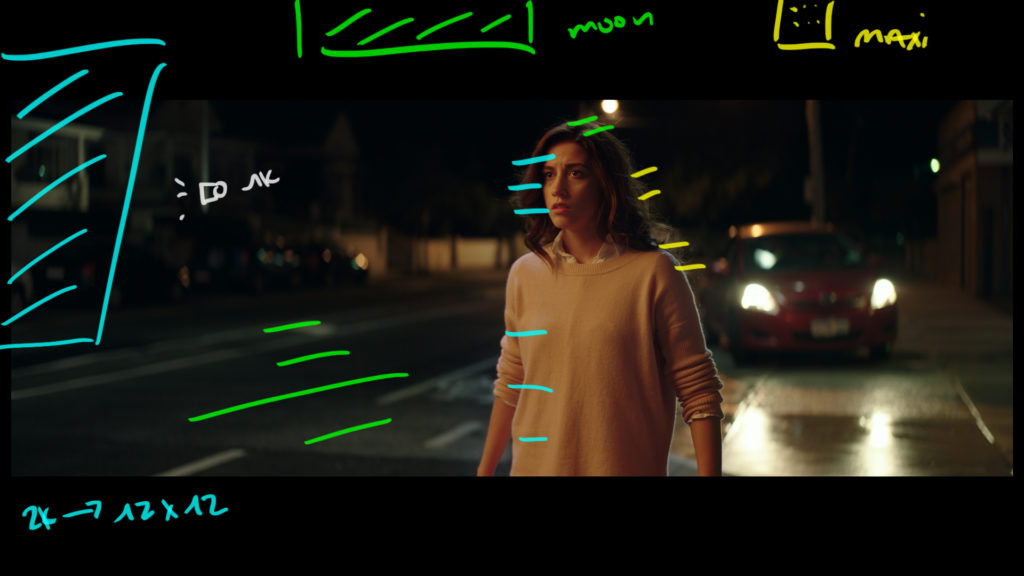
Shot #4 - Down the Line
The Shot
We move from the wider version to the medium shot.
The Lighting
The lighting is exactly the same as before except for two things.
We have moved the 12x12 bounce so that it is slightly frontier and so it wraps the light around her face more to add a bit of highlight on her shadow side cheek.
We have flipped on the same Arri 1k that was lighting the BG houses in shot #1 so that we have some level in the BG.
The Result
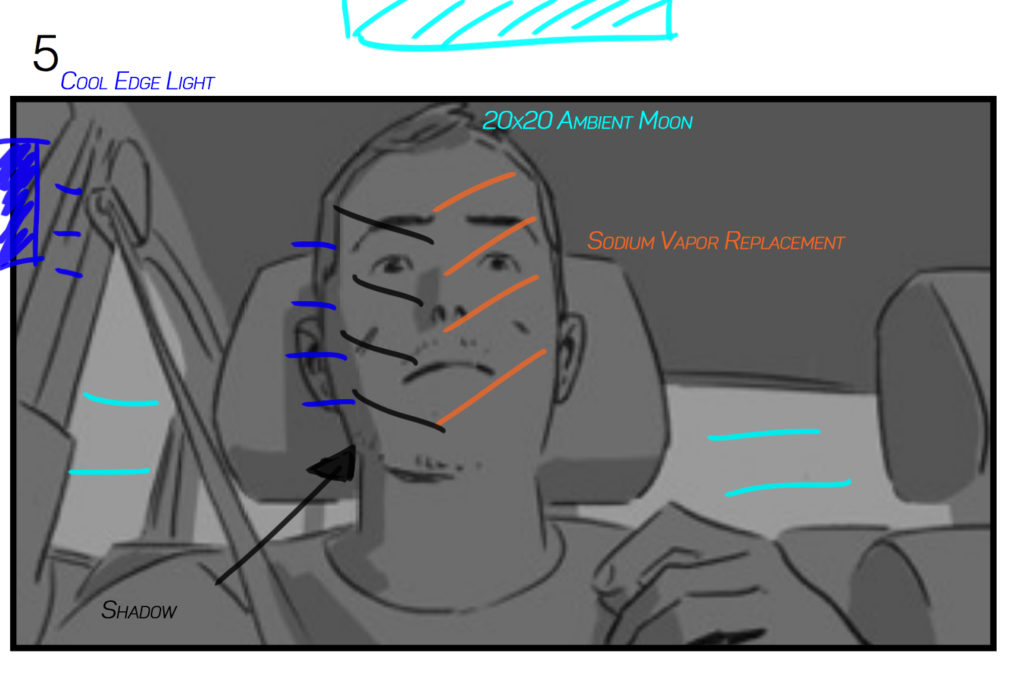
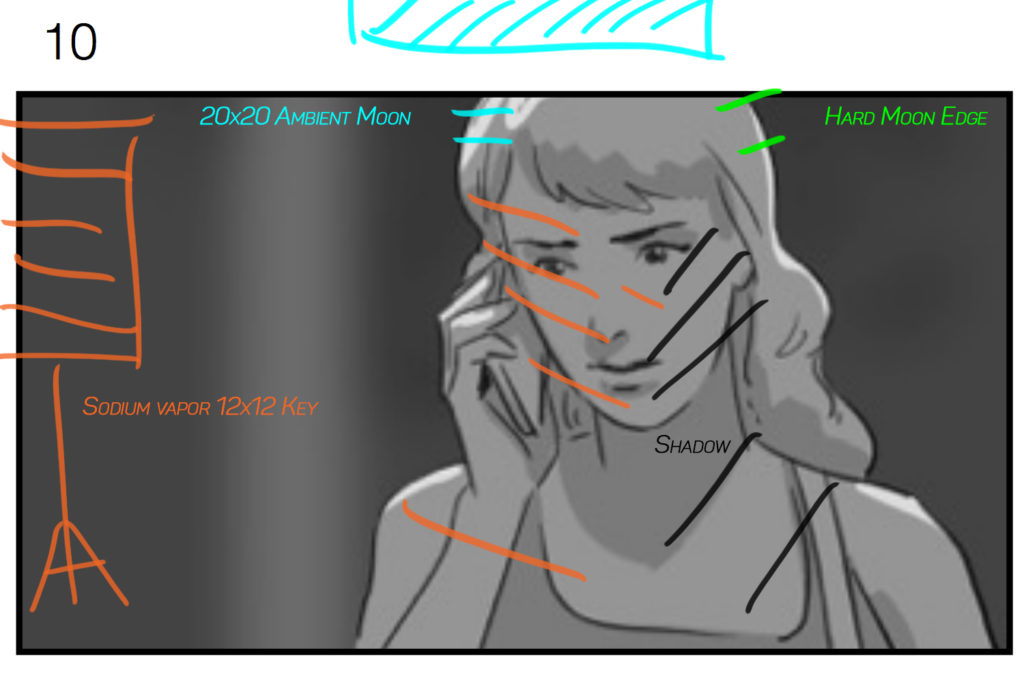
Shot #5 - The Close Up
The Shot
Now we are just punching in even closer for a full Close Up as our talent calls the power company for help.
The Lighting
We used the exact same light as before with our Moon Bow and Maxi Brute combination and the 12x12 and 2k still going. The key difference was to get the right level of softness there is a 4x4 frame of diffusion just out of shot camera left.
The frame softened the key light just enough to make things balance out a bit more and have the shadows not quite so harsh. Then to refine the levels even more and make the scene slightly less scary we brought in a 4x4 poly to fill in the shadows a bit.
The Plan
The Result
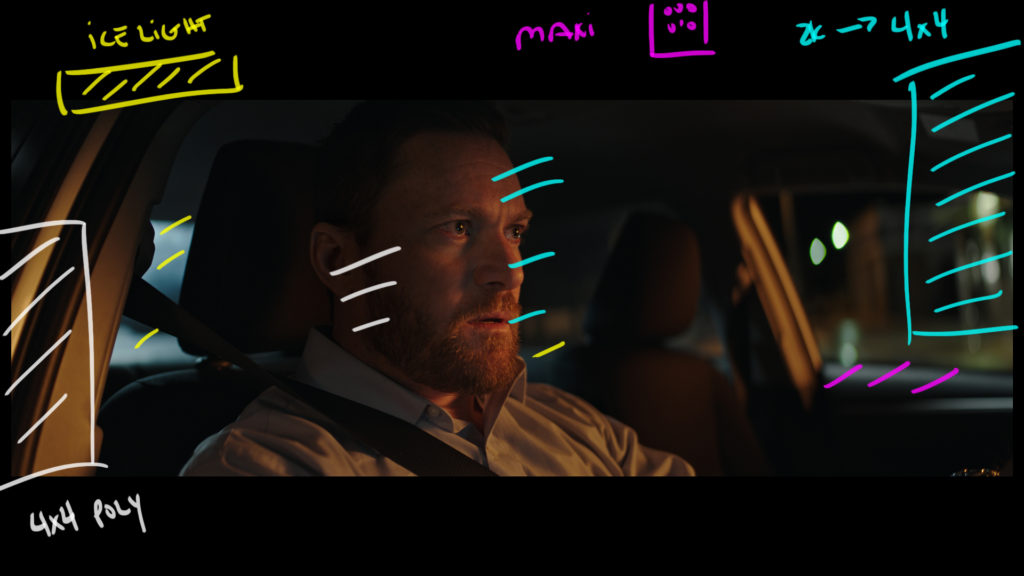
Shot #6 - Back in the Car
The Shot
In this shot we are back in the car but have swung around so we are slightly more profile.
The Lighting
We wanted to keep the same shape and mood as the previous car interior with one exception.
Because we were so profile on the angle we loss the reflectivity of the edge-y icelight on his shadow side.
We simply replaced that lamp with a 4x4 poly and we were good to go.
The Plan
The Result
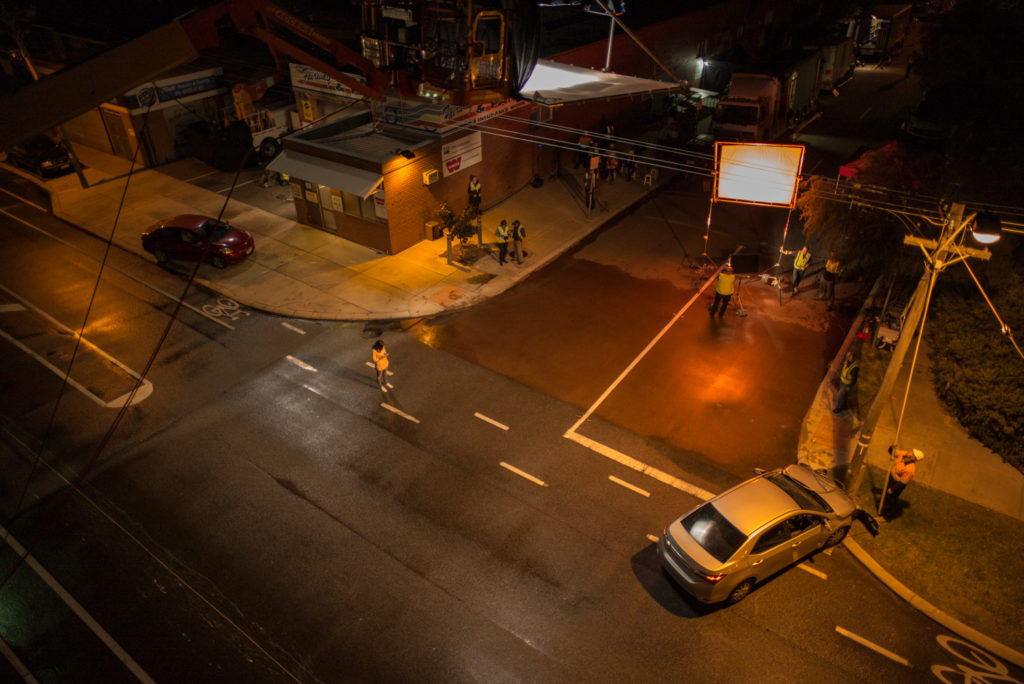
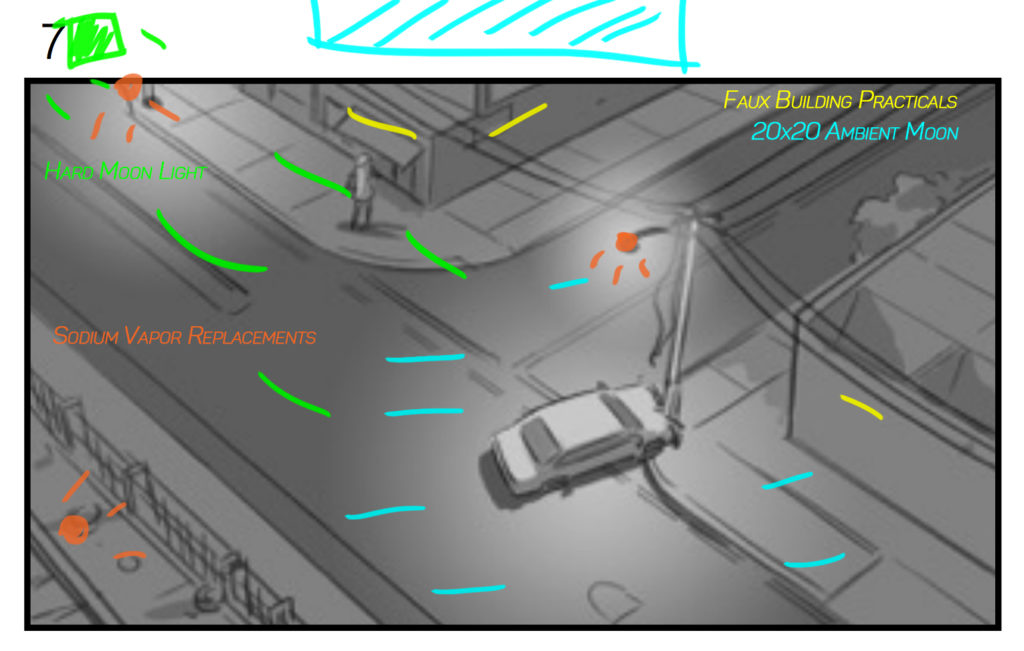
Shot #7 - The Elevated Wide
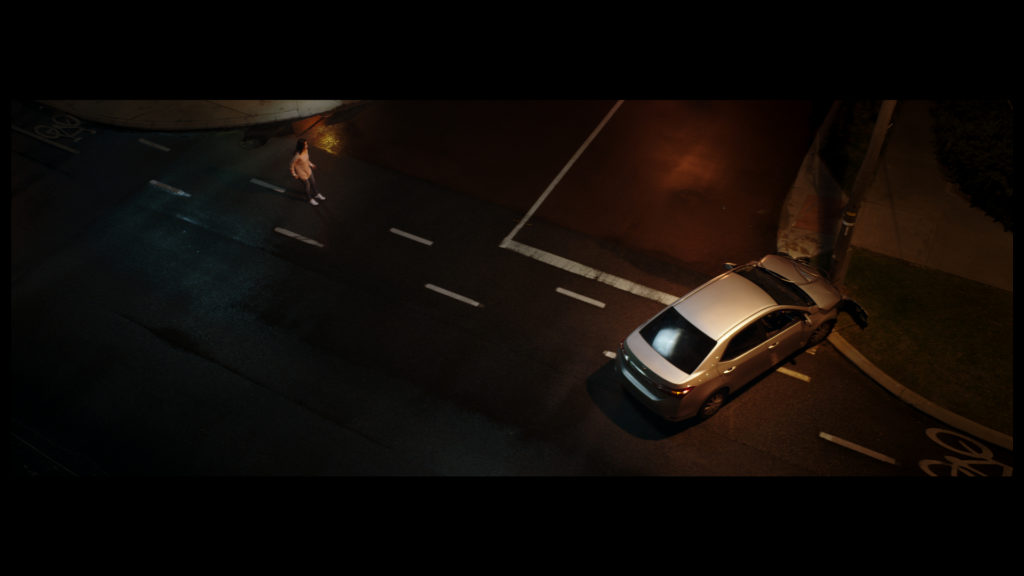
The Shot
In this shot we needed a higher angle to show the 8 meter distance the power company wanted people to stay back from fallen lines.
The Lighting
We used all the moon elements we have already talked about and the only addition is a 12k into a 12x12 bounce to add a bit of level to the road above the car.
Everything else was already built into the lighting from previous scenes.
The Plan
The Results
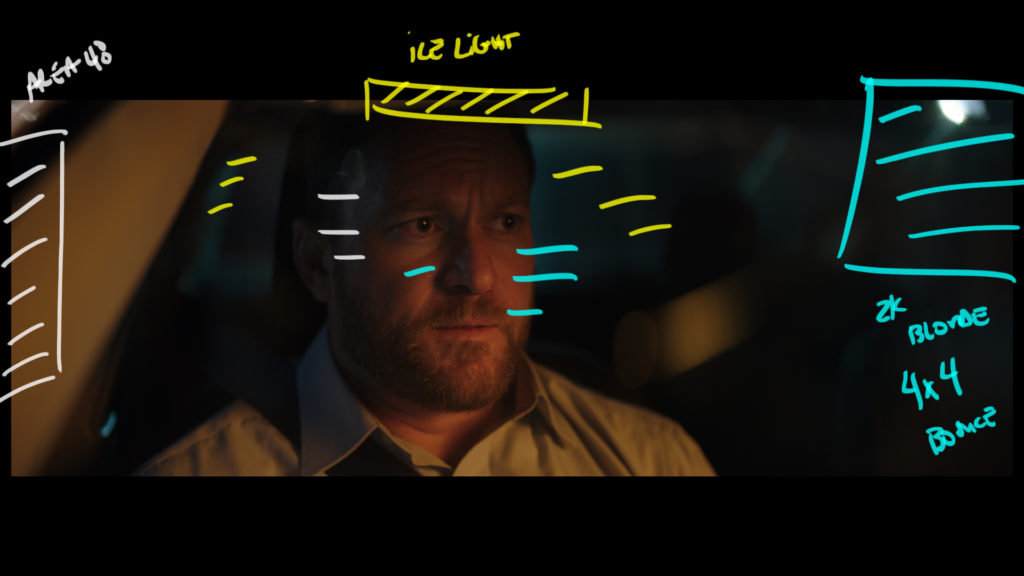
Shot #8 - The Reversed Car Interior
The Shot
This was the dreaded 3rd angle on the guy in the car.
Dreaded because from a cinematography point of view we had already established the angle of the light in the car. It was coming from the right and creating the shadows in the previous shots.
Now he was going to be front lit by that same light and the shot would be flat and shitty.
We needed to shift some things around to save the shot.
The Lighting
This isn't an easy situation to make look nice and natural.
To make it look nice is easy. You simply switch all the lamps to the opposite side and you are good to go. The problem is that doesn't match any of the other lighting.
To have it sit in the same world you have to compromise on all the angles of the lamps to get in the rough ball park.
We did rotate all the same lights we had previously for this shot but not as much as if we had only been shooting this angle. It looks a bit flatter for it.
We pushed the 4x4 lamp camera left, moved the ambient overhead moon so it was hitting the new BG better, and then dressed in the icelight to camera.
The Plan
The Result
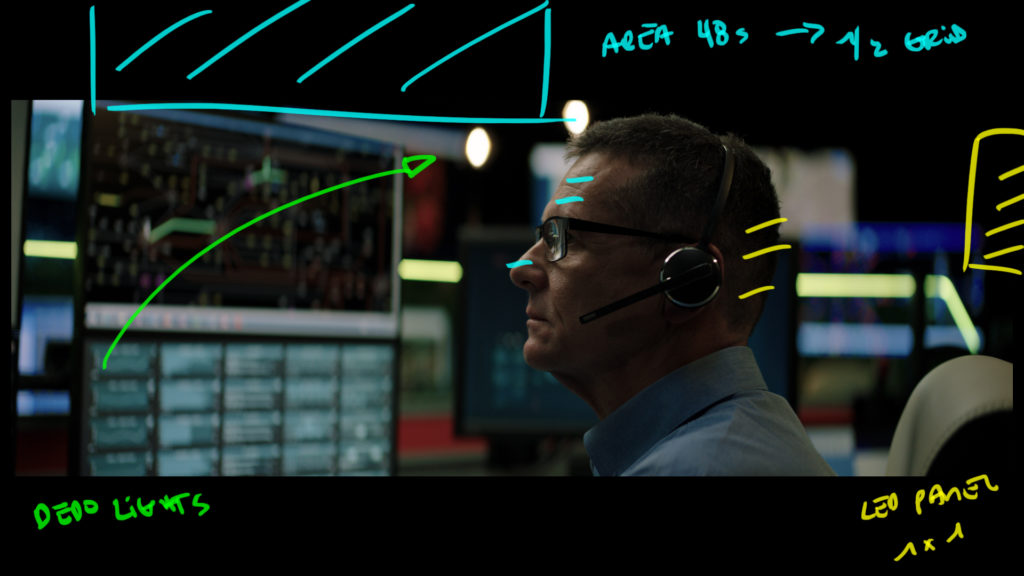
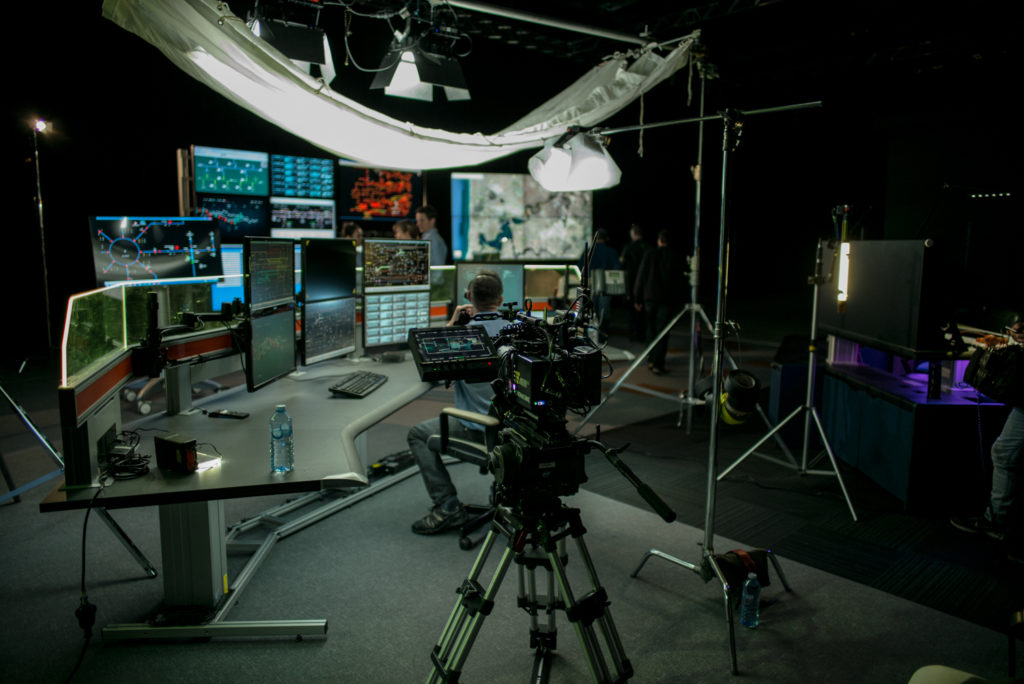
Shot #9 - The Call Center
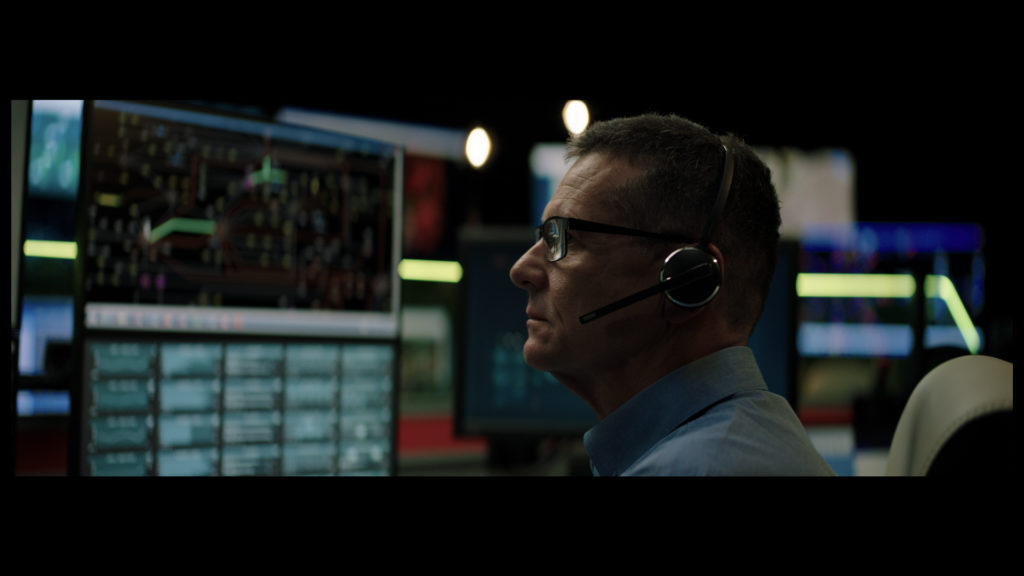
The Shot
Our bystander calls the call center and this guy answers.
The Lighting
This was all in a studio set up but I wanted to keep a muted feel to the light.
We didnt have lots of time or crew so we came up with a very simple toplight set up.
We had 2 Area 48 LEDs pushing through some 1/4 grid that was folded over on itself a few times.
WE played with the angle and the position until we got enough light into the eyes without losing too much contrast in the process.
We finished it off with a bit of fill on his camera right side from a little 1x1 panel dimmed and diffed until it was just pushing a tiny bit of level out of it.
The Result
Shot #10 - Lights Out
The Shot
This was the shot that dictated the lighting of the entire commercial.
The lights and power go out as the team fixes the issue. All the street lights and house lights needed to be out but we still needed level from our moon sources to get an exposure.
The Lighting
This is where our soft moon came in handy. It just feels like there is a bit of light coming from above and then the harder moon edge does the rest.
Peppered in the shot were some car practicals and headlights and we finished it off with some flash lights on the extras and instructed them where to shine them to get the desired lighting effects.
The Plan

The Result
Night Exterior Cinematography
Challenges are always fun and this commercial was full of them.
Hopefully you can take some of the techniques shown in this breakdown and incorporate them in to your own work.
Just remember to start with the key areas and get the size of the spaces you need to be lit up and work backwards from there.
If you do use any of these techniques please leave a comment on how they worked out for you.
awesome work, saw your ig a while back and knew Road to Perdition was gonna be an inspiration, thanx for all the info on these breakdowns
Hey, awesome podcast as always. One thing i wanted to clear up was whether the streetlamp which got hit by the car was blacked off or not? And also in similar situations when you are accenting a street light with a light unit of your own, would you advice the street light to be blacked or turned off; or would you keep it on along with your unit? If it’s on, what are the solutions to avoid double shadows and other problems? Thank you, your podcasts are reaaally helpful, godspeed!
The Wide shots have the street lamps on. Every shot were you cant see the streetlight over the car it is off.
Hi, I’m new to this podcast (discovered it through your interview with Ben Consoli on GoCreative Podcast) and really enjoying it, keep up the good work!
A problem with the high hard backlight I have had and also observed in many other films is that it reflects on the road surface and makes it unnaturally bright, an effect that is exacerbated by a wet down. I don’t see this in your wide shot at all – congratulations! How did you control the spill from the maxi and keep the light just where you needed it?
Also there is a green light source reflected on the road that cannot be accounted for by the lights in your description. Is that from the “wrong” (metal halide?) practical street light you mentioned in the podcast? I really like it even though it is not motivated at all!
Hi Chris
The backlight just misses high and is super far away. That is why it isn’t showing up in the reflection. If it were lower you’d see it in the ground reflection.
The green is the wrong color street lamp as you suggested.
Cheers
Hi Patrick
Thanks for this.
Were you shooting at 5600 for this one?
Cheers