Listen to the Podcast:
On the podcast this week we look at the challenges of using vintage anamorphics on a commercial project and what you can do to make the challenges work for you.
Most cinematographers like the look of vintage anamorphics but the flaws in the mechanical design, housings, consistency, and more of these lens sets can be a shock if you aren't prepared. Hopefully by the end of this episode you will know what to look for the next time your put in the order for vintage anamorphics.
Podcast Sponsor:

This episode of the podcast is brought to you by the fine folks at Music Bed. Help support the show and save cash by using the promo code Wandering20. You save 20% on your next on site license and make future episodes possible all at the same time.
Patreon Live Stream: The Grade

We are taking the live stream up a notch this week by doing a live grade session. I have asked the Patreon members to send in some still frames from their projects and we are going to give them a grade while talking about the process and the decisions.
I am looking forward to having fun with some of the footage but also trying to show a few creative tricks for the grade that can help ad some polish to your next shoot.

Patreon has played a huge role in helping the podcast maintain it's schedule and help raise the bar of production. I am very grateful for the support and it just wouldn't be possible without your help.
If you like to become a Patron of the podcast and get access to all the live streams, tutorials, behind the scenes clips and more simply click on the link below to get instant access.
The Wandering DP Patreon Group: Get extended content each and every week
Phantom Thread: Film Test
The Concept: Channeling Wes Anderson

First up let's talk about the look and feel of the project. In speaking with the director he wanted to use center framing, static cameras, linear dolly moves, and whips pans to tell the story of this family being visited by support geeks from the future.
The concept was a family at home experiencing the frsutation of slow interenet. In come the geeks and the work their magic and fix it all up. Easy enough.
The issue is with that Wes Anderson style of framing and camera movement you need a large space to make the scenes work. On our budget and the tight pre-schedule before the shoot we were forced into shooting in an actual house. Tiny passageways, small windows and low ceilings meant we were going to be in for an interesting shoot.
The Gear: Camera & Lighting
We shot on the Arri Alexa XT in 4:3 mode with a set of Lomo 2x Anamorphics. We mainly used the 35mm and 50mm at a T5.6. We wanted a slightly deeper stop to see all the design elements and be able to spot multiple people in the frame and varying depths.
For lighting we used a standard location package with the heavy lifting coming from Arri 12ks and 6ks.
Camera Equipment List:
- Arri Alexa XT - 800 ISO, 25fps, 180 degree shutter
- Lomo Anamorphics (35, 50, 80mm)
- Schneider Water White 138mm Diopter Set - (+.5, +1, +2, +3)
- Arri SXU-1 Follow Focus System
- Bright Tangerine VIV Matte Box
- Formatt Hitech Firecrest IRND - (.3 - 2.1)
- Oconnor 2575D Fluid Head + Sticks
- SmallHD 703 High Bright On Camera Monitor
- FSI CM240 - Director's Monitor
- Paralinx Tomahawk 1:2 Wireless Video System
Lighting Package:
- Arri 12k HMI
- Arri 6k HMI x 2
- Arri 4k HMI
- Arri M18 HMI
- Litemats 2L & 1
- 12x12 1/4 Grid
- 8x8 Hi-Lite
- Various practical bulbs & dimmers
- Various 4x4 diffusion frames
The Job: Vintage Anamorphics
Shot #1 - The Wes Anderson Dolly


The Shot
In true Wes Anderson style we kicked off the shoot with a lateral tracking move that saw 3 characters in 3 different rooms.
The Lighting
The difficulty in lighting this space came from the fact that we were on location. The house was small and pokey and the exterior was not ideal either.
We used a series of Arri 12ks, 6ks, and 4ks to get the right amount of daylight into each respective zone during the track.
The Result


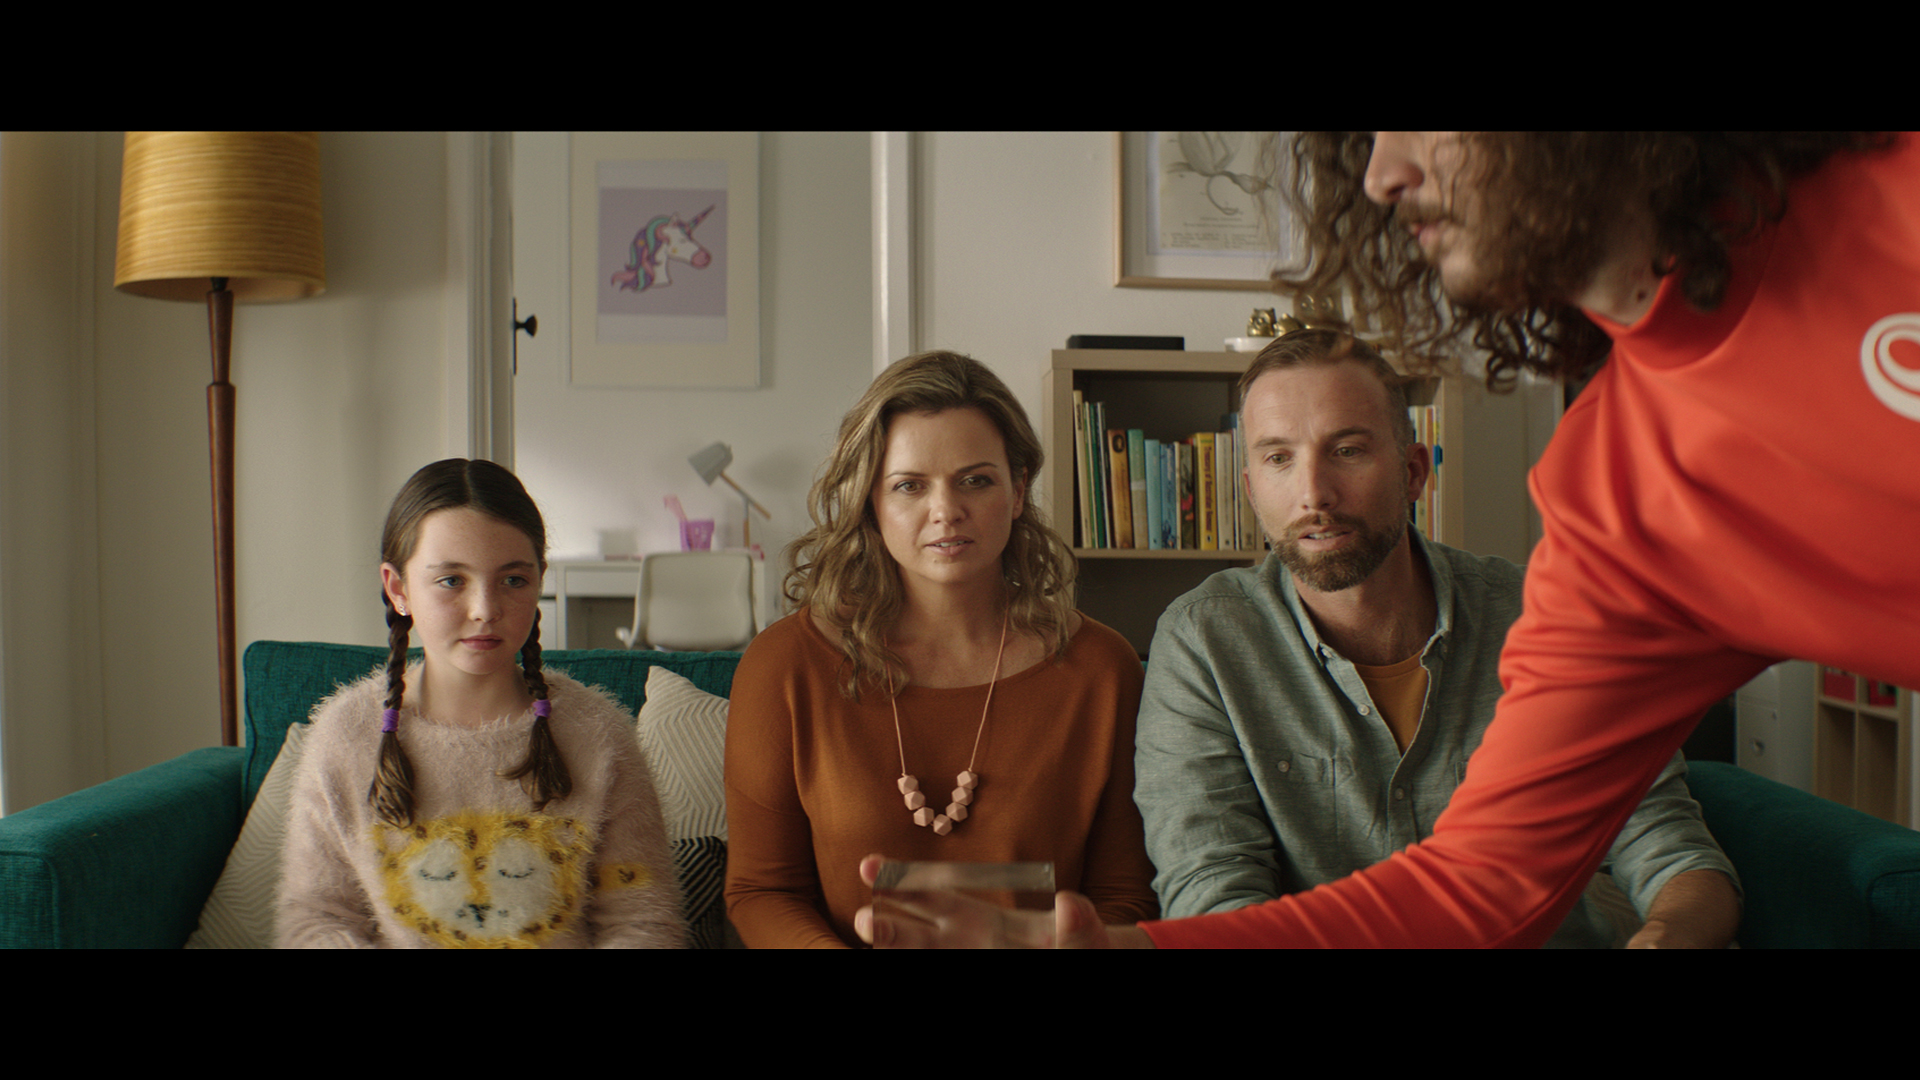
Shot #2 - The Wide Ensemble

The Shot
This is our first reveal of the hero characters. They appear as we whip pan from the previous shot to this one.
The Lighting
We used a 12k through a 12x12 1/4 grid camera right for the main key light then for the background light we used a 4k through diffusion to create the slash of light. Camera right is a 12x20 Neg.
The Result

Shot #4 - The Reverse Wide

The Shot
This is the reverse of the previous shot. It is a reaction to the appearance of the trio. We needed to be wide enough to see all 3 characters in their rooms.
The Lighting
For the lighting we kept it very close to the tracking shot with the addition of some LEDs inside and an M18 inside the main room to help give the 12k key light a bit more wrap.
The Result

Shot #3 - The Trifecta

The Shot
This shot was the reveal of the gag for the spot. The geeks show up and wow our struggling family with their gadget from the future.
The Lighting
This was our most complicated set up with a number of different lamps playing. We had almost the same set up as before but rearranged the focus of the lamps and fabric and added some litemats above the camera to get a bit more light on their shadow sides.
The Result

Shot #5 - Shooting Windows

The Shot
The dreaded shot looking at the only window in the room. The client wanted a slightly less moody look for these spots overall and to keep this shot from getting silhouette-y I added an LED panel inside made by Creamsource to help lift the room tone.
The Lighting
The 6k was still playing from outside and inside to raise the ambient and make it a bit less moody we used an LED with a bit of diffusion surrounding it.
The Result

Shot #6 - The Top Down Look

The Shot
Our first product shot.
The Lighting
This is a fairly standard top down product shot. We shot these product shots at the end of the day when it was completely dark at the location.
We used an M18 through an 8x4 frame of diffusion for the key light camera right and then added neg to taste camera left. To lift out the front details we had a few small poly bounces.
The Result

Shot #7 - +3 Diopter

The Shot
The front on product shot.
The Lighting
Much the same as before except now because we wanted more detail than we were getting with just the backlight we brought in an icelight led to add just a hint of highlight reflection in the front of the modem.
The Result

Hey Patrick. How far away are you placing the lamps from the window? Far back as possible with the diffusion frames about 6-8 feet away from the lamp or closer to the window/frame?
Cheers
Tav