On today's show we break down a recent TV commercial and take a detailed look at the lighting, lens choices, blocking, camera angles, and every other aspect that went in to the creation of the spot.
Lighting Car Interiors (especially at night) takes a little getting used to and if you aren't careful it is very easy to overdo the lighting, making it feel too lifted/flat, or under do it and you end up with an image with very little interest because it is so dark.
The challenge is in balancing just on the edge of the shadows without going to hot on the skin tones.
If you are interested in lighting car interiors hopefully you can take some the ideas we discuss here and improve upon them.
Enjoy the episode!
Patreon: Feature Film - More Camera Tests + We are Shooting
It is official. We are rolling.
Check out a selection of the camera tests we performed before rolling and listen in on how those tests informed our decision making going forward.
The Patreon content is about to get very interesting as I'll be recording every day on set and keeping a running diary of how the film is progressing.
You can find this week's Patreon content by clicking the link below:

If you are a fan of the podcast and want more video content the patreon group is the place to be. Each and every week I release an exclusive podcast, video, or live stream just for the Patreon members.
Patreon members also get access to the Private Facebook community for the show. The podcast couldn't exist without the Patreon support and I do my best to take care of the supporters.
Lighting Car Interiors - Embrace the Shadows
No special gear on this one. We shot on some Xtal Xpress lenses from Panavision here in Australia and everything else was just your run of the mill commercial film/lighting packages.
Camera Gear:
Check out the gear I use on all of my commercial shoots by clicking the link below:
Wandering DP Commercial Cinematography Gear
The only kit not listed on that page is the set of Xtal Xpress Anamorphics.
For lighting we went all LED and it was a great opportunity to test the majority of lamps we will be using on the feature.
Lighting Car Interiors: The Set Ups
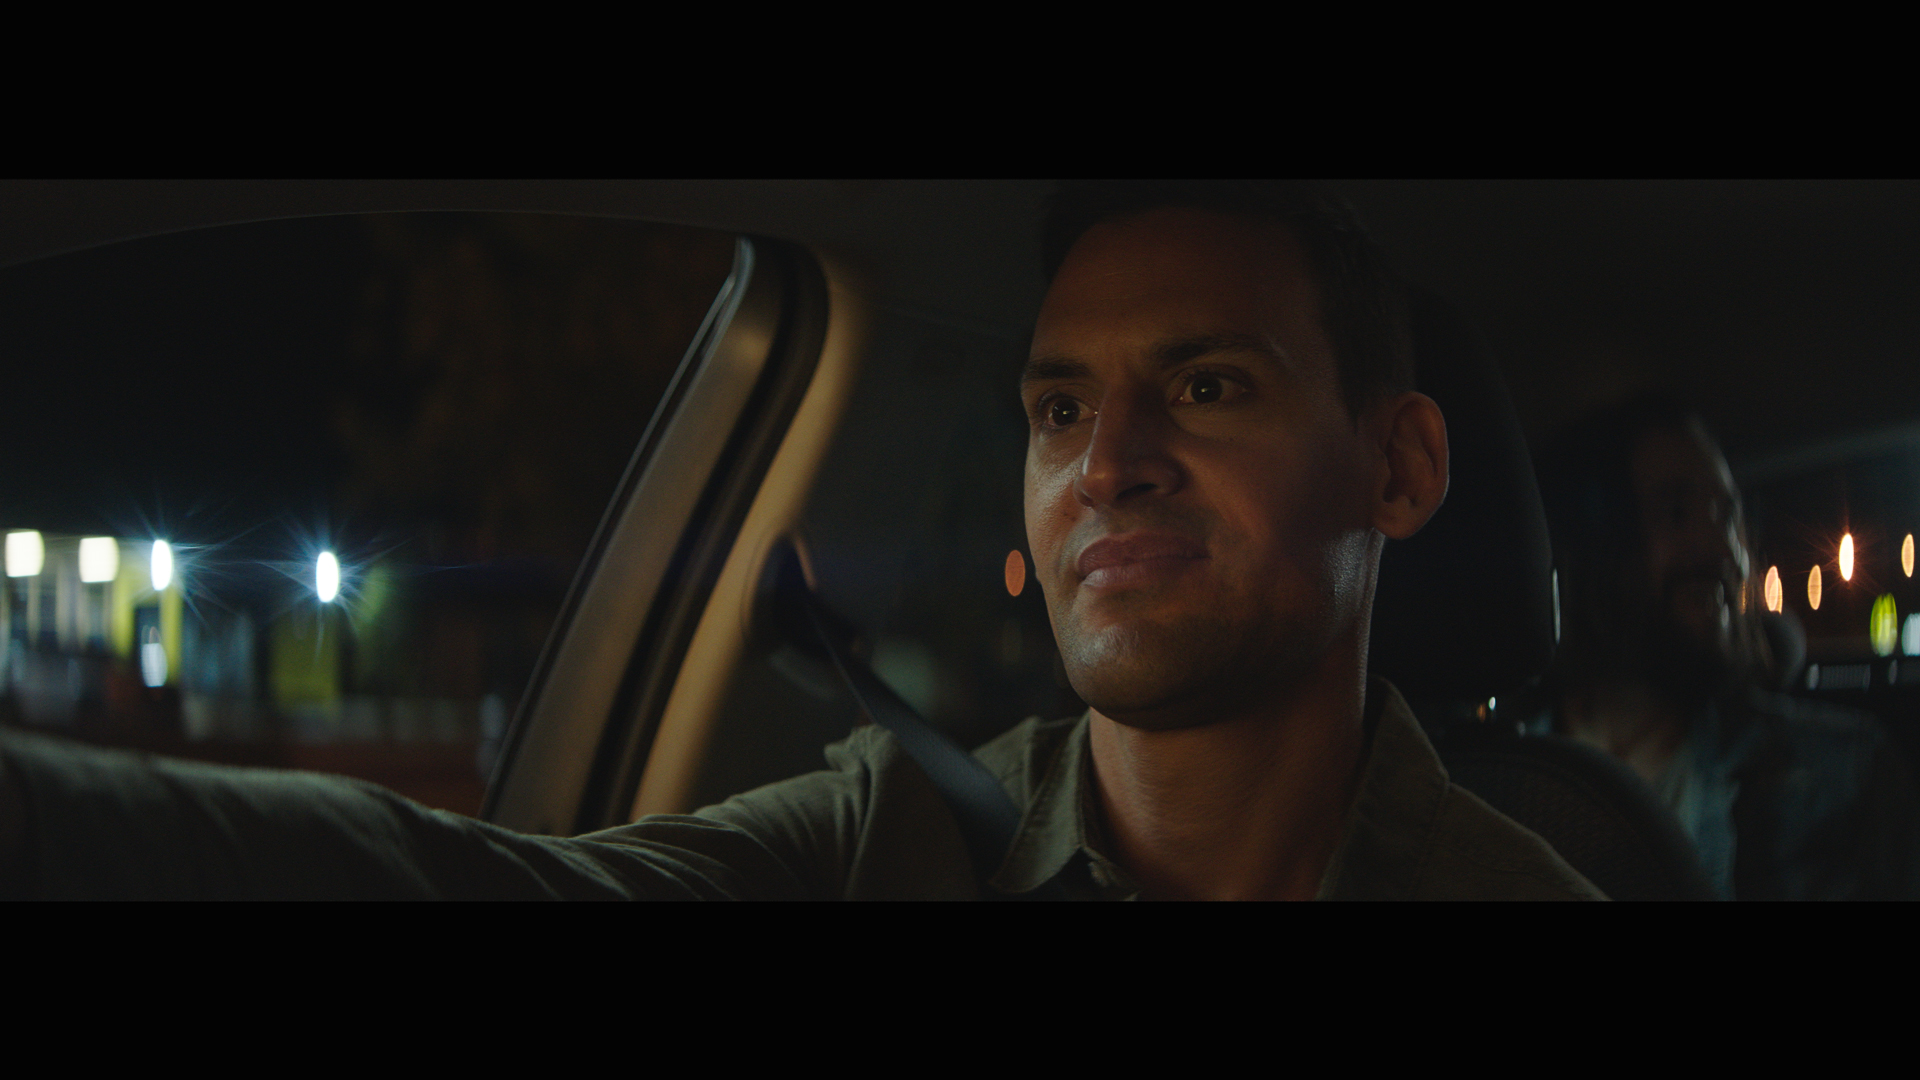
Set Up #1 - The Driver Rolling


The Shots
The ad opens in a single on our main guy as he drives down a night road.
The Lighting
We had two sky panels at the front and back of the vehicle. The back for a bit of top down moon light and the front for the reverse head light gag.
Then on the sides we had a litemat 2L for moon push and 4x Astera AX1 tubes to create street lamps in between the actual street lamps.
The front window was covered with a 6x6 of 1/2 grid.
The Result

Set Up #2 - The Wide Reveal


The Shots
In the wide of the car interior we see one shot without the policeman and one shot with him. The Wide was definitely the trickiest to balance and get right for the lighting.
The Lighting
WE used all the same lamps and diffusion as the first but we had to add in a small 2' tube inside the car to help bring up the policeman as he watched the driver from the backseat.
The Result


Behind the Scenes
Set Up #3 - The Over the Shoulder

The Shots
This was our reveal of the police lights inside the vehicle. We played it from the back seat to see the effects on the rear passenger.
The Lighting
Identical lights to the previous set ups except we removed the diffusion from the front window, we wheeled the front skypanel around to frame left to get it out of shot, then finally we lowered the rear sky panel frame right to help it push the police lights deeper into the car.
The Result

Set Up #4 - Lights, Camera, Action


The Shots
Back to our single on the driver but with the added police light effects.
The Lighting
Same as the previous single except we had the rear skypanel out of the shot frame right to help push it in further.
The Result


Set Up #5 -Switching to Day Mode

The Shots
Switching to the day sequence we start back on a single of our driver as she is texting and driving.
The Lighting
The lighting in the day scene is all about the position of the car on the road relative to the path of the sun. We picked a road that ran from north to south and limited our takes to southern travel. That put the sun on the drivers side and a little bit behind the vehicle.
We added a 4x4 frame of diffusion over the drivers window of hi-lite. Then over the hood of the car we used a 6x6 solid to block ambient light coming from behind camera.
On the passenger side windows we place black cloth on the interior to suck up more light on the fill side.
The Result

Set Up #6 - Day Reveal

The Shots
The cop shot during the day.
The Lighting
We removed the black cloth on camera right and then rigged an Arri Skypanel behind the drivers head out the window to help push in more daylight on to the police officer.
The Result

Set Up #7 - The Stolen shot

The Shots
Same as our police light reveal in the night time set up.
The Lighting
Looking forward meant we could get the skypanel in much closer for the police light effect. During the day it was much harder to read the light from outside as it needed to overpower the level from the sun.
The skypanel is bright for an LED but not bright enough to give us what we needed to come from the outside.
We butted it right up against the window and blasted it through and that gave us just enough to read the police lights inside the car on the back of the headrest.
The Result

Set Up # 8 - Busted


The Shots
Our final sequence of the drivers being pulled over.
The Lighting
Because we only had two skypanels we took the one from the rear of the car and placed it on the biggest stand we had in the van. We matched it to the existing sodium vapor lamps on location then place it frame left and slightly behind the police officer.
Everything else stayed the same on the exterior of the car. We did add a net at the last second to bring down the passenger frame right as he was too distracting at the same level as our driver.
The Result


Set Up #9 - The Reprise

The Shots
Same as above but during the day.
The Lighting
We were seriously racing at this point to get this shot before the sun dipped behind the houses behind.
We ran a 6x6 ultra bounce just held by the gaffer frame left to bounce sun back on the officer then added 2 4x4 floppies frame right to help get some contrast in the shot.
The Result

Hi Patrick, again an awesome breakdown…!
I guess Im stupid asking this, but I thought you would have some bts pictures in here of the rigging of the car?
Goodluck with your feature!
As always, thank you so much, Patrick!
Btw, where are the videos of low loader you mentioned in podcast?
Great lighting set up! Any BTS stills of the car being rigged for the night scene? For the wide shot, is the camera on the dashboard and what focal length was it on?