Today on the podcast we are looking at a recent TV campaign that was shot on the Arri Master Anamorphics inside of a commercial airplane.
There were lots of different challenges with the lighting, blocking, and finding the right camera angles.
This si the closest thing we will ever get to doing on a blocking podcast.
I hope you enjoy!
Podcast Sponsors:

Remember to use the coupon code "Wandering20" to save 20% off your next on site license.
Film + Music Giveaway!!!

The good folks over at the Musicbed are giving away a free ticket to one lucky winner.
The Film + Music Conference is a no brainer if you are a creative professional and this is an awesome chance to save yourself some cash and make some new friends.
To enter simply click the link below and follow the instructions. The more you share the contest the more entries you get so start spreading the word and improve your odds of snapping up this $599 ticket for FREE!
Patreon: The Live Stream & More

If you are a fan of the podcast and want more video content the patreon group is the place to be. Each and every week I release an exclusive podcast, video, or live stream just for the Patreon members.
Patreon members also get access to the Private Facebook community for the show. The podcast couldn't exist without the Patreon support and I do my best to take care of the supporters.
Arri Zeiss Master Anamorphics: Pre-production

The hardest part of the pre-production process was sourcing a plane set for our location. The plane had to be large enough to fit everything in, yet small enough to feel intimate and real.
Once production sourced a training aircraft the real fun began.
We needed to light up a large portion of a working airplane hangar so that it looked as though the plan was in full flight mode.
Lighting was going to be the biggest task on the day for making sure the commercial was a success.
Camera Gear:
Check out the gear I use on all of my commercial shoots by clicking the link below:
Wandering DP Commercial Cinematography Gear
The only kit not listed on that page is the set of Arri Zeiss Master Anamorphics.
We had an odd set to meet our unusual shooting demands including a 28mm, 75mm, 100mm, and 135mm plus a doubler.
Lighting Gear:

3 x 6k HMIs
5 x 4k HMIs
2 x 12x12 1/4 grid
2 x 12x12 1/2 grid
Litemat 2L
4x4 Floppies
4x4 frames of 1/4 CTS (for sun side)
Arri Zeiss Master Anamorphics: The Set Ups
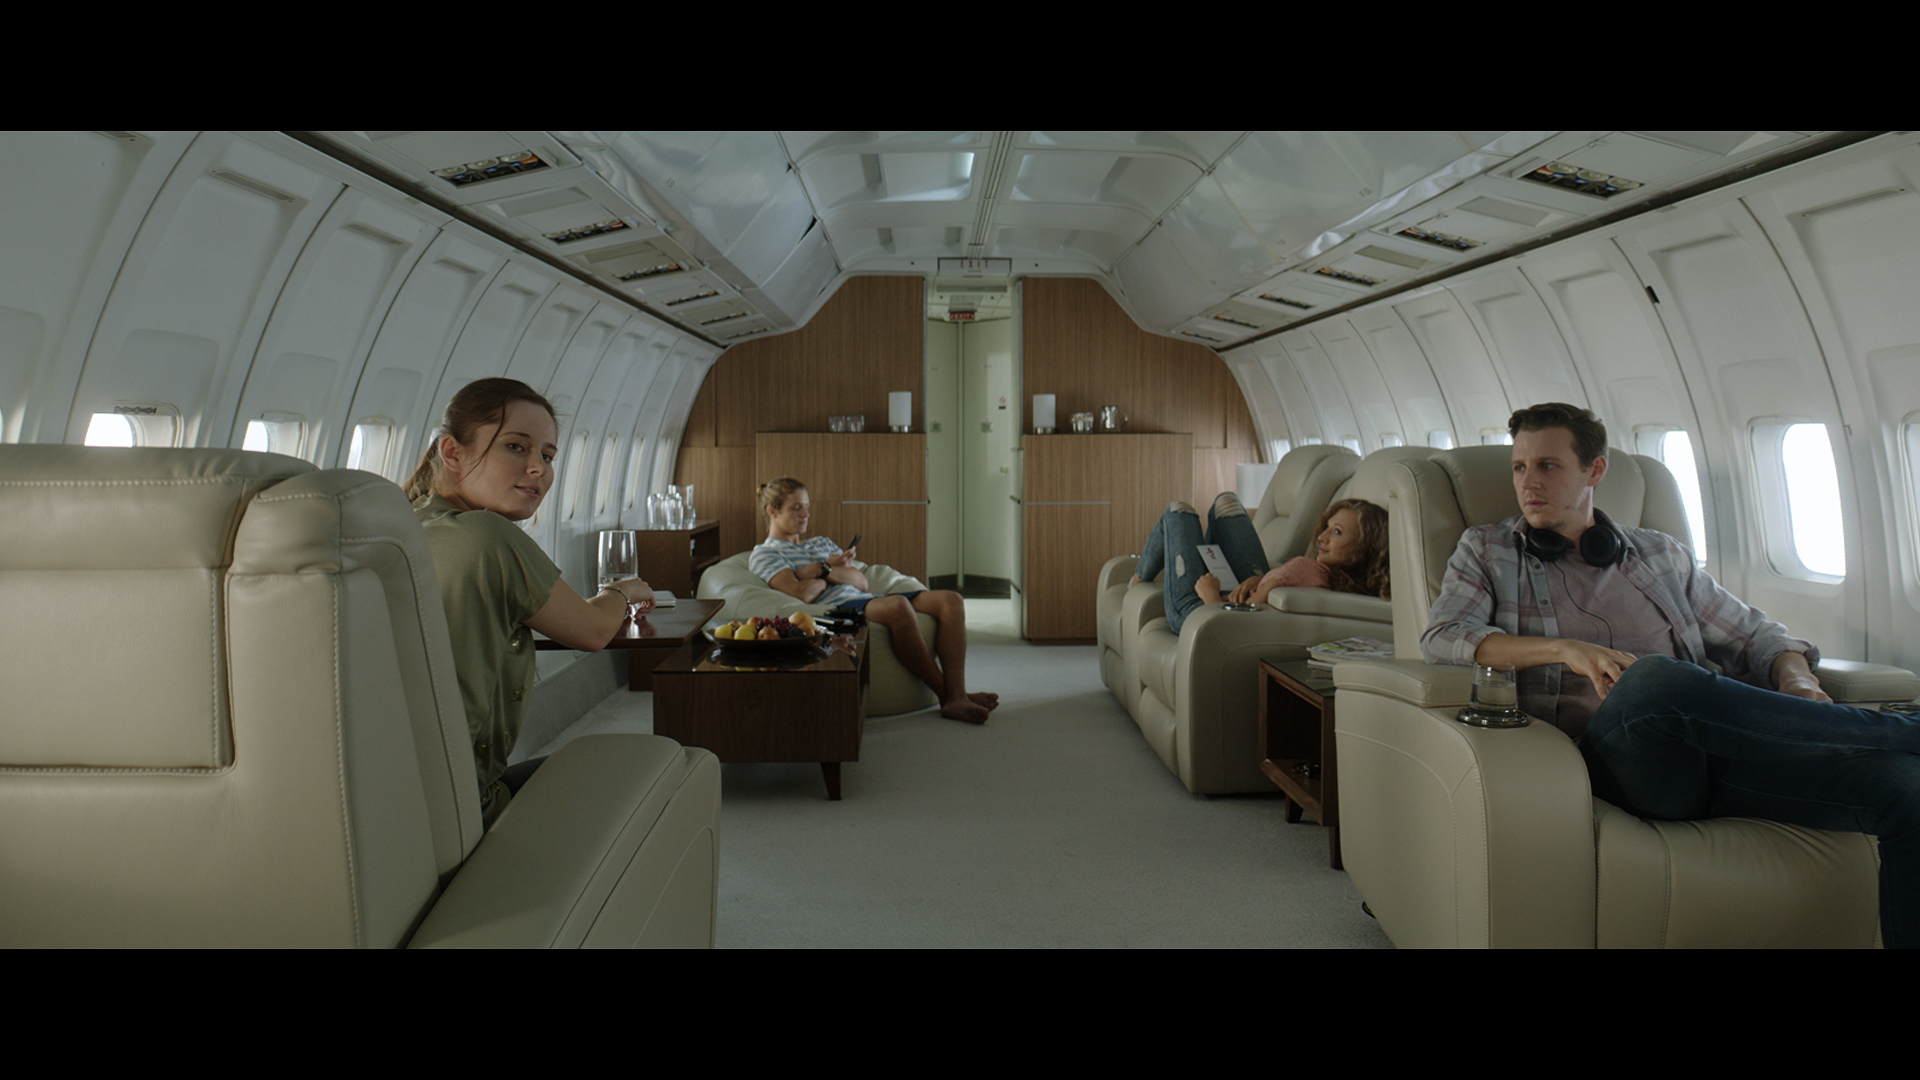
Shot #1 - The Wide

The Shot
The first shot we are talking about today was actually the final shot in the commercial. Our wide shot on the 28mm Arri Master Anamorphic reveals to the audience that our talent have been inside a plane for the entire spot.
The Lighting
We lit the wide shot on the day first up so we could then work backwards for our coverage. We used 3 6ks and 4 4ks to light up both the sun and ambient sky sides of the plane.
We used 1/4 CTS on the sun side and a slightly less intense diffusion on the 12x12s to get a bit more direction out of the 6ks.
The ambient side was left uncorrected for a truer white/blue look.
The Result

Behind the Scenes

Shot #2 - The Beginning

The Shot
This was the opening shot of the ad and you can immediately see what the challenge was going to be.
We needed to frame each person on the plane so that you could not tell their location. If we gave away the plane interior too early the gig would be up.
The Lighting
To create mood in each of the individual single shots we killed any lights behind the camera, brought in some negative fill in the form of 4x4 floppies then used the outside lights to wrap the key around to where we wanted it.
Here the 6k with 1/4 CTS through the 12x12 of 1/4 grid is doing the heavy lifting.
The Result

Behind the Scenes
Shot #3 - The Conversation

The Shot
Another single shot of our second character.
The Lighting
This woman's position in the plane made her lighting the most difficult. Not a lot of room behind her meant we had to lean her off the sofa to get a nice edge light in and we then brought in the neg camera right and used a Litemat 2L to help carry the key from outside the plane to her near side cheek.
The Result

Shot #4 - Switching the Line

The Shot
Our third character single shot.
The Lighting
The lighting in this shot is all down to blocking and camera placement. Our conversation between 4 individuals had to be interesting and different enough to carry the ad for almost 20 seconds.
This characters light would have looked much different had we positioned the chair in another location inside the plane.
In this spot we got the daylight ambient as the key light from camera right and we are using the 6k sun camera left as our edge light.
The Result

Shot #5 - Coming Around

The Shot
Our final character establishing single. The fourth member of the ad now has a place inside the plan and in the lines of the camera going forward.
The Lighting
Because his chair blocked most of the sky blue ambient from camera right all we had to do was adjust the sun side 6ks then add a litemat and we got enough shape out of him and the back wall to buy it.
The Result

Shot #6 - Straight On

The Shot
The most technically difficult shot of the day.
The Lighting
We had never looked directly out the window inside the plane until this shot.
We used our plane of dualling 6ks to wrap the light from behind our character than used the blue screen in the background to give us our sky color. It also helps being on a 75mm Arri Master Anamorphic @ T1.9.
Inside is a bit of frontal litemat fill.
The Result

Shot #7 - A New Angle

The Shot
Reverse of the previous shot.
The Lighting
We changed angles and height to keep things interesting and the change in screen direction for our talent meant a new lighting set up for our man.
We used just the Litemat for a key and then used the sky blue side ambient 4ks for our back light.
The Results

Shot #8 - The Finale

The Shot
This is the moment we step out and take a breath before the audience finds out that we have been on a plane all this time.
The Lighting
Again we used the 6k sun side 12x12s to sell our sun light then inside used the litemat to wrap the key around a bit more to the shadow side.
We negged the windows behind the camera and that was all we needed for this particular look.
The Results
