Listen to the Podcast:
On the podcast this week we look at two different daytime interior scenarios and how we used various HMIs to light the respective rooms.
HMIs are generally the go when re-creating sunlight on location and while LEDs have come a long way the HMI lamps are still the go to for most cinematographers.
In this episode we walk through the set ups and breakdown why we chose the specific lamps for each scene and what the specific purpose of each lamp is.
Patreon Live Stream: The Dark Side
On Patreon this week we are scheduled for our live stream. Last week was a bit impromptu with the return of the Wonder Boi and hopefully this week we can continue where we left off.
It has been lots of fun interacting and seeing all the great work the Patreon group is pumping out. If you are interested in helping to support the show and would also like access to the live stream and all of the extra Patreon content click the link below to become a supporter:
The Wandering DP Patreon Page: Support the Show + Hours of Bonus Content

The Spot: Lighting with HMIs
The scenes we are looking at today are from a series of commercials featuring a large puppet. There isn't any relation between the subject of the podcast and the subject of the commercial other than the fact that we needed to use quite a few HMI lights in order to get the job done.
Each of the scenarios features two people and the puppet interacting in a daytime interior scene. The challenge was in lighting quickly and still providing enough variance between the set ups to make the spots feel the same but different.
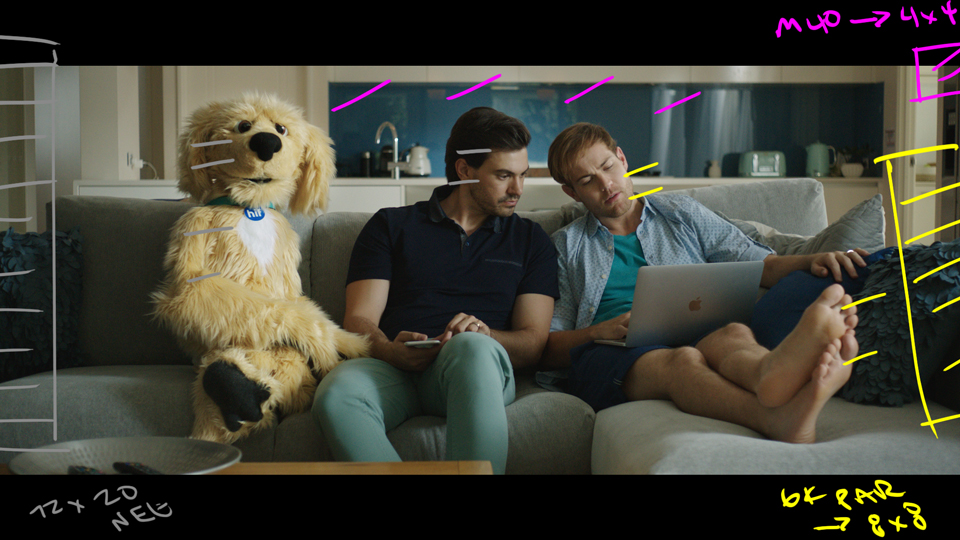
Shot #1 - 3 M40 HMIs & a Family Room

The Shot
This was the first set up of the 4 days and we wanted to establish the lighting for all the shots in this one room in the wide. We took some extra time and lit everything from outside so we could quickly move between shots once set up.
We see a man enter frame and sit down next to his wife.
The Lighting
The house was facing west and as we were shooting this set up in the morning it meant we weren't competing against the sun with our HMIs. We could light using smaller fixtures and that is exactly what we did.
We ended up using 3 Arri M40s all through various strengths of 4x4 diffusion to provide our faux sun from camera left. Iniside we used the curtains and the sheers to provide control.
The Result

Behind the Scenes


Shot #2 - The Mid Shot

The Shot
We now moved in for the two shot of the couple reacting to the puppet's appearance.
The Lighting
As our initial set up set the tone for all of our shots we were able to move quite quickly through the other shots in thew room. We adjusted the Negative Fill camera right to create some shape and slightly re-arranged the M40s out the windows to get a bit more interest in the frame and we were good to go.
The Result

Shot #3 - The First Single

The Shot
Next we went in to the two single shots. We started with the male talent's single as it meant re-arranging less equipment which meant it was faster and better for the schedule.
The Lighting
All we did here was move in the negative fill camera right to provide some more shape on his face. Everything else stayed the same from the previous shots.
The Result

Shot #4 - The Lady

The Shot
This was the first shot were we had to break the original set up. W needed a bit of shape on the woman so we had to re-arrange a few of the lights outside and also the modifiers inside.
The Lighting
We killed one of the outside M40s and shuffled the other one around so it created a bit more shape on the woman's face. We walked in the negative fill to act as both neg and a cutter for the back wall all at the same time.
The Result

Shot #5 - The Turn Around

The Shot
We flipped everything around now and set up for the wide reveal of the puppet.
The Lighting
We wanted to maintain the directional lighting of the previous wide so we used the same fixtures but moved them further back outside the room. We had 1 Arri M40 (with 1/4 CTS) now hitting the back wall and the two others providing a key light for the puppet and the talent on the near sofa.
The white walls in the room were bouncing too much light around so we slid a 12x12 black on the camera left wall to suck up any light we didn't want spreading into the scene.
The Result

Shot #6 - The Track In

The Shot
This was a slow dolly track in as the puppet delivers his punchline.
The Lighting
This was identical lighting to the previous shot except as with the other CUs we were able to control the contrast more by walking in the black camera left.
The Result

Shot #7 - Moving On

The Shot
We start in this room with a wide shot of the 3 characters seated on the sofa.
The Lighting
The most important part of the lighting in this shot comes down to the direction of the sofa and camera relative to the windows of this location. We chose to orient the sofa perpendicular to the windows so we could get a nice raking sidelight happening.
We used a 6k Par through a 4x4 from and then through an 8x8 up against the window to provide the key light for our talent. Then in the BG we used an M40 to boost the ambient level so everything felt more balance.
Down the hall we had a Kino 4x4 to just add a bit of light to a dark corner of the shot.
The Result

Shot #8 - Slightly Closer

The Shot
Again we punch in on the same line to get a two shot of the main talent.
The Lighting
We used exactly the same set up as before but now as we can get closer and control more we start to add a bit more shape to the faces. We walked in the black to help create some contrast and then re-positioned the 8x8 to get a bit more softness.
The Result

Shot #9 - The Room Flop

The Shot
The final turn around reveals the rest of the room and the puppet sitting on the coffee table.
The Lighting
We rotated the 6k through 4x4 through an 8x8 about 30 degrees and used that as our key. We added the sheers on the back windows and place a 12x12 double net out the window camera left to help control the heat coming from the sun hitting the outside walls.
By pointing the camera down we eliminated a lot of the hot BG and saved ourself from doing anything major to the backyard. A quick fix as the day was coming to an end.
The Result

Lighting with HMIs: Always Go Bigger
We didn't really chat about it on the show but an easy rule of thumb when working with bigger HMIs and being unsure of the amount of level you need is to always go bigger. You can always throw a wire in front of a head but if you are short on level it is a huge time suck.
When in doubt go big!