We are back at the breakdowns this week on the show as we dive deep into what looks like a very straightforward set up.
Day exterior work looks easy but it is not. You will never see a DP stress out more than on a day exterior scene that needs to filmed over the course of multiple hours/days. A lighting and continuity challenge to say the least.
In this episode we look at just such a tvc and how we dealt with the challenging conditions.
Enjoy the episode!
Patreon: The Imitation Game

On the Patreon Breakdown this week we look at The Imitation Game shot by Oscar Faura. This movie looks beautiful and everything from the production design, wardrobe, locations, and camerawork all play in to the making this a beautiful film.
Lots of things to take away from this breakdown so if you are a Patreon Supporter be sure to click the link below and check out this week's featured content.
You can find this week's Patreon content by clicking the link below:

If you are a fan of the podcast and want more video content the patreon group is the place to be. Each and every week I release an exclusive podcast, video, or live stream just for the Patreon members.
Patreon members also get access to the Private Facebook community for the show. The podcast couldn't exist without the Patreon support and I do my best to take care of the supporters.
Location, Location, Location


Camera Gear:
The usual gear on this job. Shot Alexa Mini LF in OG mode mostly at 800 ISO. We paired the Alexa with the beautiful Signature Primes.
Lighting was all bounce and neg relying most heavily on the 12x12 Ultras and a 12x12 Hi Lite on the front lit shot.
The Spot - Location, Location, Location
Set Up #1 - The Starter


The Shot
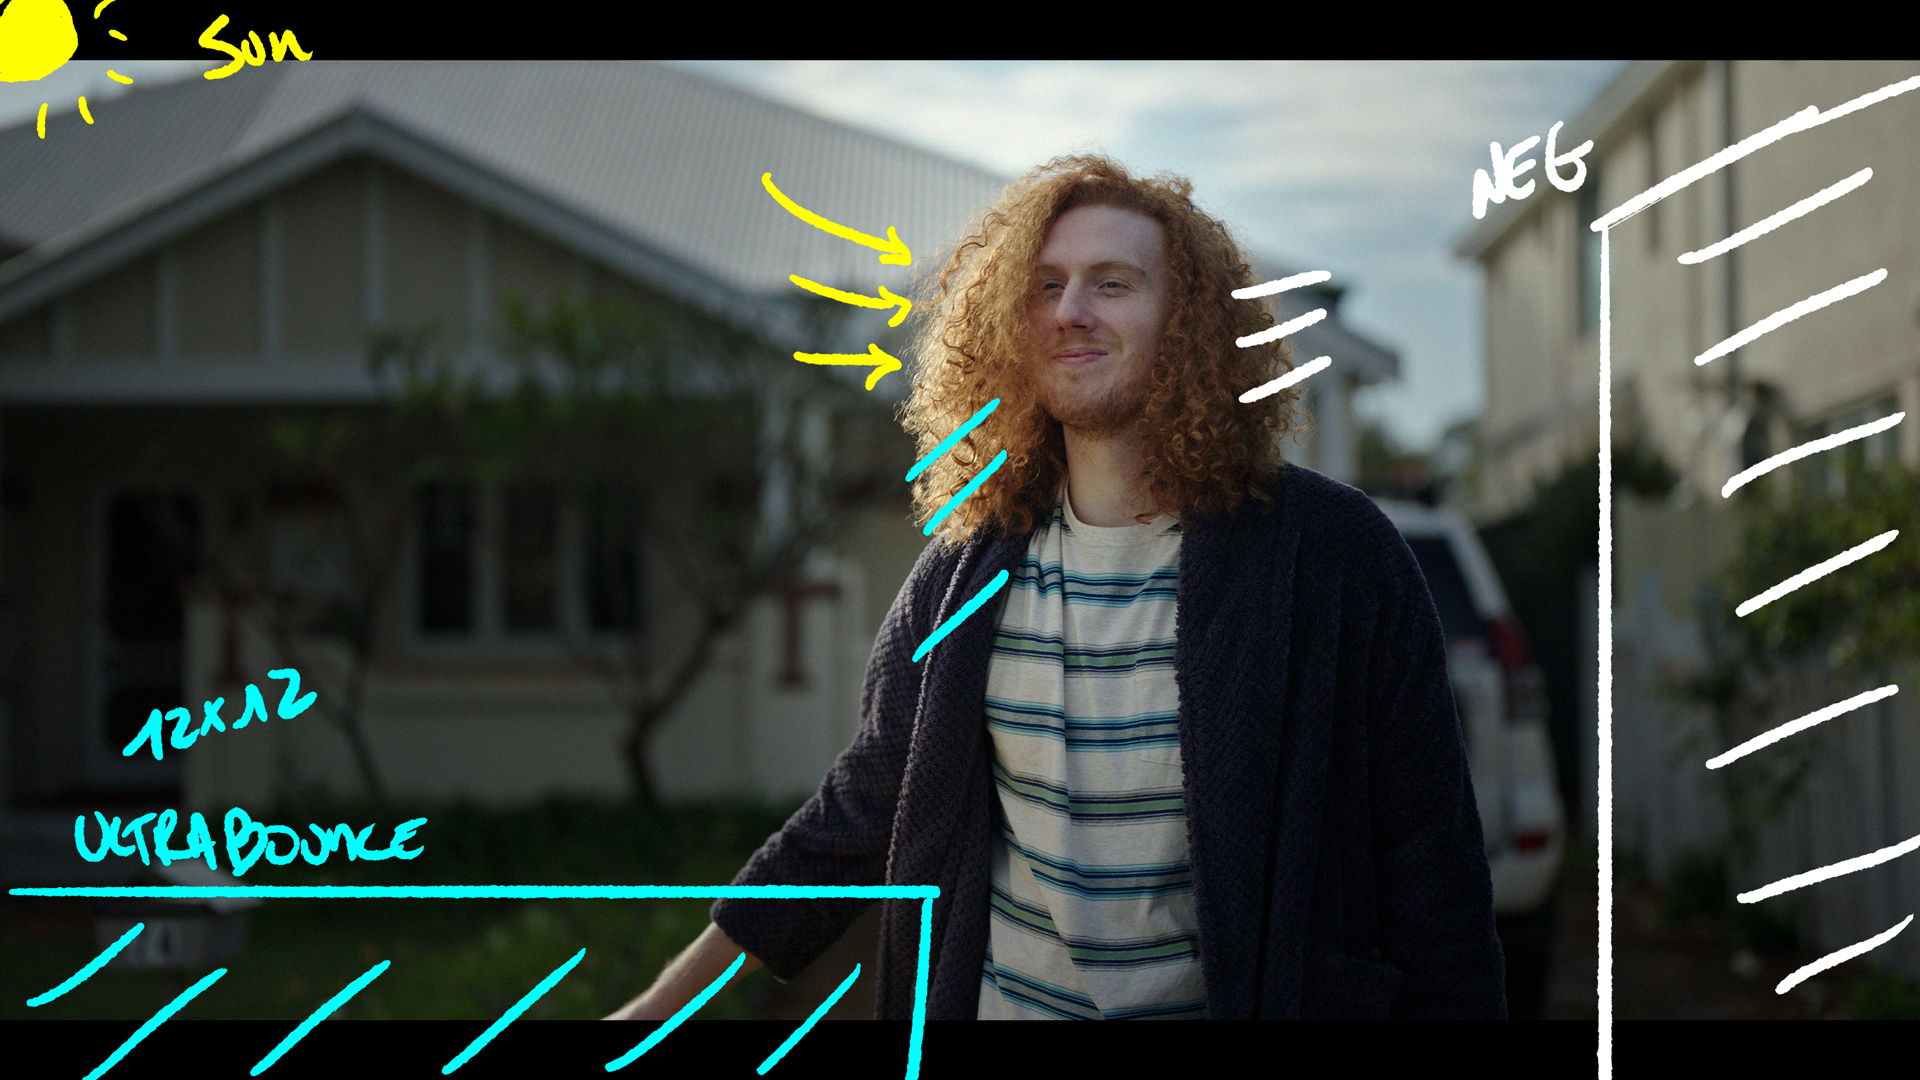
Guy carrying baby wheels trash can down to his curb.
The Lighting
We used the 12x12 Ultra to return the backlight coming from the morning sun. Camera right is a 12x12 Neg that helps to shape the contrast locally.
The real lighting key here was the time of day and making sure we had a hint of sun to help with the bounce levels.
The Result

Set Up #2 - The Sort of Wide


The Shot
Hero Talent wheels bin to the curb.
The Lighting
Same as above but further back as shot size has increased.
If you look closely you can see how things close off as you are forced to move lighting elements further away from the talent.
The key here was making sure we had a back edge strong enough to give the Ultra Bounce the proper kick,
The Result

Shot #3 - The Close Up Reaction


The Shot
The single shot reaction for our hero talent.
The Lighting
Exact same set up as before but we can now bring everything closer and make it more nuanced with a bit more control.
We changed the angle on the talent relative to the camera so we could soften the highlights from the sun as well.
The Result

Alexa Mini LF - Full Frame

Set Up #4 - The Wide

The Shot
Camera slowly crabs right to left as the 3 characters spot each other on the street.
The Lighting
Sun just out of the frame in a back light position. Cross fingers and hope for the best.
The Result

Set Up #5 - The Last Single


The Shot
Same as before but now the company ambassador wipes past the frame in the foreground.
The Lighting
To balance the sun and the shade all we did here is add the 12x12 Ultra Bounce right next to camera frame right. That return gave just enough level to the foreground black elements to help pull them from complete darkness.
The Result


Shot #6 - The Walk

The Shot
Brand guy walks across the road and says hello.
The Lighting
Because we were tighter but on the move in this shot we used a 6x6 of ultra bounce to walk alongside the talent from frame left.
Depending on which way the talent was looking meant this was at times a little too fronty but there weren't many other options aside from a sandwich which is a no no.
The Result


Shot #7 - The Front Light


The Shot
Lady reacts to the other two guys bringing out their bins at the same time.
The Lighting
This was always going to be our front lit shot.
We used a 12x12 of Hilite to help control the levels then added a 12x12 net behind it to knock down the level further.
On the camera right side we used a 12x12 Neg to help create some shape in the foreground.
The Result

